In which a grown adult builds an entire self-hosted automation flow just to find out which World of Warcraft specs are popular this week.
Priorities? Never heard of her.
The Problem Nobody Asked Me to Solve
Look, every Wednesday after the weekly Mythic+ reset, I used to open raider.io, squint at the spec popularity tables, and whisper “Frost Mage mains in shambles” or “When will Ret Pala finally get nerfed??” to myself like some kind of WoW-obsessed gremlin.
Then one day I thought: “What if a robot did this for me and posted the results to Discord?” – which I then also check once a week, but it is different! Don’t question meeee!
I have this n8n instance running, I basically never have a real use case for it. Most of the flows people build, in my opinion, are pretty wild like connecting ChatGPT to Tinder.. I am writing about using coding and n8n to automate World of Warcraft..you think Tinder is a use case for me ??
This guide will walk you through the entire self-hosted setup. Even if you don’t care about WoW (first of all, how dare you), the stack itself is incredibly useful for any web scraping or automation project.
The Stack: What Are We Even Working With?
Here’s the dream team:
| Service | What It Does | Why You Need It |
| n8n | Visual workflow automation (think Zapier, but self-hosted and free) | The brains of the operation |
| Browserless | Headless Chrome as a service, accessible via API | Renders JavaScript-heavy pages so you can scrape them |
| Python Task Runner | A sidecar container that executes Python code for n8n | Because sometimes JavaScript just isn’t enough (don’t @ me) |
| PostgreSQL | Database for n8n | Stores your workflows, credentials, and execution history |
| Watchtower | Auto-updates your Docker containers | Set it and forget it, like a slow cooker for your infrastructure |
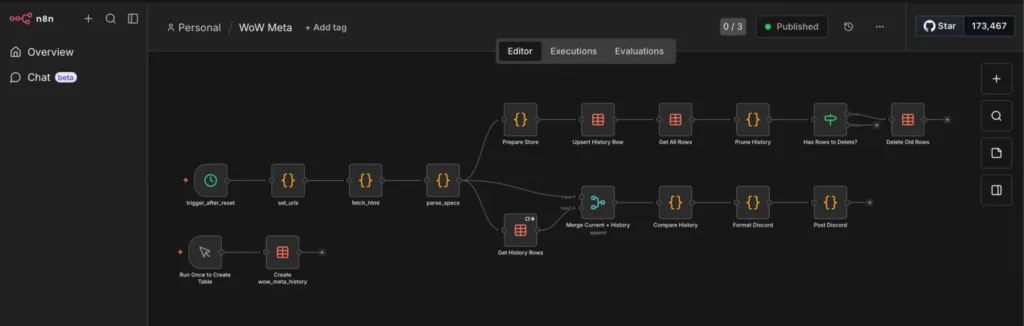
Step 0: What we will build
You will need these files in your directory:
deploy/
├── docker-compose.yml
├── Dockerfile
├── n8n-task-runners.json
└── .env
This is my example flow it gets the current top classes in world of warcraft, saves them to a database, and calculates deltas in case they change:

This is the final output for me, them main goal is to show n8n and the “sidecar” python container. I just use it for World of Warcraft stuff and also reoccurring billing for customers of my consulting business.
One major bug I noticed is that the classes I play are usually never the top ones. I have not found a fix yet.
Guardian Druid and Disc Priest, if you care 😘
Step 1: The Docker Compose File
Create a deploy/ folder and drop this docker-compose.yml in it. I’ll walk through exactly what’s happening in each service below.
services:
  browserless:
    image: browserless/chrome:latest
    ports:
      - "3000:3000"
    environment:
      - CONCURRENT=5
      - TOKEN=your_secret_token # <- change this
      - MAX_CONCURRENT_SESSIONS=5
      - CONNECTION_TIMEOUT=60000
    restart: unless-stopped

  n8n:
    image: docker.n8n.io/n8nio/n8n:latest
    restart: always
    ports:
      - "5678:5678"
    environment:
      - N8N_PROXY_HOPS=1
      - GENERIC_TIMEZONE=${GENERIC_TIMEZONE}
      - DB_TYPE=postgresdb
      - DB_POSTGRESDB_DATABASE=${POSTGRES_DB}
      - DB_POSTGRESDB_HOST=${POSTGRES_HOST}
      - DB_POSTGRESDB_PORT=${POSTGRES_PORT}
      - DB_POSTGRESDB_USER=${POSTGRES_USER}
      - DB_POSTGRESDB_PASSWORD=${POSTGRES_PASSWORD}
      - N8N_BASIC_AUTH_ACTIVE=true
      - N8N_BASIC_AUTH_USER=${N8N_BASIC_AUTH_USER}
      - N8N_BASIC_AUTH_PASSWORD=${N8N_BASIC_AUTH_PASSWORD}
      - N8N_ENCRYPTION_KEY=${N8N_ENCRYPTION_KEY}
      - WEBHOOK_URL=https://${DOMAIN_NAME}
      # --- External Python Runner Config ---
      - N8N_RUNNERS_ENABLED=true
      - N8N_RUNNERS_MODE=external
      - N8N_RUNNERS_BROKER_LISTEN_ADDRESS=0.0.0.0
      - N8N_RUNNERS_AUTH_TOKEN=${N8N_RUNNERS_AUTH_TOKEN}
      - N8N_RUNNERS_TASK_TIMEOUT=60
      - N8N_RUNNERS_AUTO_SHUTDOWN_TIMEOUT=15
    volumes:
      - n8n_data:/home/node/.n8n
      - ./n8n-storage:/home/node/.n8n-files
    depends_on:
      - postgres

  task-runners:
    build: .
    restart: always
    environment:
      - N8N_RUNNERS_TASK_BROKER_URI=http://n8n:5679
      - N8N_RUNNERS_AUTH_TOKEN=${N8N_RUNNERS_AUTH_TOKEN}
      - GENERIC_TIMEZONE=${GENERIC_TIMEZONE}
      - N8N_RUNNERS_STDLIB_ALLOW=*
      - N8N_RUNNERS_EXTERNAL_ALLOW=*
      - N8N_RUNNERS_TASK_TIMEOUT=60
      - N8N_RUNNERS_MAX_CONCURRENCY=3
    depends_on:
      - n8n
    volumes:
      - ./n8n-task-runners.json:/etc/n8n-task-runners.json

  postgres:
    image: postgres:15
    restart: always
    environment:
      - POSTGRES_DB=${POSTGRES_DB}
      - POSTGRES_USER=${POSTGRES_USER}
      - POSTGRES_PASSWORD=${POSTGRES_PASSWORD}
    volumes:
      - postgres_data:/var/lib/postgresql/data

  watchtower:
    image: containrrr/watchtower
    restart: always
    volumes:
      - /var/run/docker.sock:/var/run/docker.sock
    command: --interval 3600 --cleanup
    environment:
      - WATCHTOWER_CLEANUP=true

volumes:
  n8n_data:
    external: false
  postgres_data:
    external: false
You will notice that I use a .env file, it looks like this:
# General settings
DOMAIN_NAME=n8n.home.karl.fail
GENERIC_TIMEZONE=Europe/Berlin

# Database configuration
POSTGRES_DB=n8n
POSTGRES_USER=randomusername
POSTGRES_PASSWORD=change_this
POSTGRES_HOST=postgres
POSTGRES_PORT=5432

# Authenticatio
N8N_BASIC_AUTH_USER=[email protected]
N8N_BASIC_AUTH_PASSWORD=change_this

# Encryption
N8N_ENCRYPTION_KEY=supersecretencryptionkey
N8N_RUNNERS_AUTH_TOKEN=change_this
Breaking Down the Logic
Let’s actually look at what we just pasted.
1. Browserless (The Headless Chrome Butler)
A lot of modern websites (including raider.io) render their content with JavaScript. If you just curl the page, you get a sad empty shell. I chose Browserless, because of the simple setup for headless browser with REST API.
- image: browserless/chrome: This spins up a real Chrome browser.
- TOKEN: This is basically the password to your Browserless instance. Change this! You’ll use this token in your Python script later.
2. n8n (The Workflow Engine)
- N8N_RUNNERS_MODE=external: This tells n8n, “Hey, don’t run code yourself. Send it to the specialized runner container.” This is critical for security and stability.
- N8N_RUNNERS_AUTH_TOKEN: This is a shared secret between n8n and the task runner. If these don’t match, the runner won’t connect, and your workflows will hang forever.
3. The Task Runner (The Python Powerhouse)
I really wanted to try this, I run n8n + task runners in the same LXC so it does not give me any performance benefits, but it is nice to know I could scale this globally if I wanted:
- N8N_RUNNERS_EXTERNAL_ALLOW=*: This allows you to import any Python package (like
pandasorrequests). By default, n8n blocks imports for security. We are turning that off because we want to live dangerously (and use libraries). - volumes: We mount
n8n-task-runners.jsoninto/etc/. This file acts as a map, telling the runner where to find the Python binary.
Step 2: The Python Task Runner Configuration
This is the section that took me the longest to figure out. n8n needs two specific files in your deploy/ folder to run Python correctly.
The official n8n documentation is really bad for this (at the time of writing), they have actually been made aware as well by multiple people but do not care. (I think Node-RED is much much better in that regard)
We need to build an image that has our favorite Python libraries pre-installed. The base n8n runner image is bare-bones. We use uv (included in the base image) because it installs packages significantly faster than pip.
FROM n8nio/runners:latest

USER root

ENV VIRTUAL_ENV=/opt/runners/task-runner-python/.venv
ENV PATH="$VIRTUAL_ENV/bin:$PATH"

RUN uv pip install \
    # HTTP & web scraping
    requests \
    beautifulsoup4 \
    lxml \
    html5lib \
    httpx \
    # Data & analysis
    pandas \
    numpy \
    # Finance
    yfinance \
    # AI / LLM
    openai \
    # RSS / feeds
    feedparser \
    # Date & time
    python-dateutil \
    pytz \
    # Templating & text
    jinja2 \
    pyyaml \
    # Crypto & encoding
    pyjwt \
    # Image processing
    pillow

USER runner
⚠️ Important: If you need a new Python library later, you must add it to this file and run
docker compose up -d --build task-runners. You cannot justpip installwhile the container is running.
You can choose different libraries, those are just ones I use often.
The n8n-task-runners.json
This file maps the internal n8n commands to the actual binaries in the container. It tells n8n: “When the user selects ‘Python’, run this command.”
{
  "task-runners": [
    {
      "runner-type": "javascript",
      "workdir": "/home/runner",
      "command": "/usr/local/bin/node",
      "args": [
        "--disallow-code-generation-from-strings",
        "--disable-proto=delete",
        "/opt/runners/task-runner-javascript/dist/start.js"
      ],
      "health-check-server-port": "5681",
      "allowed-env": [
        "PATH",
        "GENERIC_TIMEZONE",
        "NODE_OPTIONS",
        "N8N_RUNNERS_AUTO_SHUTDOWN_TIMEOUT",
        "N8N_RUNNERS_TASK_TIMEOUT",
        "N8N_RUNNERS_MAX_CONCURRENCY",
        "N8N_SENTRY_DSN",
        "N8N_VERSION",
        "ENVIRONMENT",
        "DEPLOYMENT_NAME",
        "HOME"
      ],
      "env-overrides": {
        "NODE_FUNCTION_ALLOW_BUILTIN": "crypto",
        "NODE_FUNCTION_ALLOW_EXTERNAL": "*",
        "N8N_RUNNERS_HEALTH_CHECK_SERVER_HOST": "0.0.0.0"
      }
    },
    {
      "runner-type": "python",
      "workdir": "/home/runner",
      "command": "/opt/runners/task-runner-python/.venv/bin/python",
      "args": [
        "-m",
        "src.main"
      ],
      "health-check-server-port": "5682",
      "allowed-env": [
        "PATH",
        "GENERIC_TIMEZONE",
        "N8N_RUNNERS_LAUNCHER_LOG_LEVEL",
        "N8N_RUNNERS_AUTO_SHUTDOWN_TIMEOUT",
        "N8N_RUNNERS_TASK_TIMEOUT",
        "N8N_RUNNERS_MAX_CONCURRENCY",
        "N8N_SENTRY_DSN",
        "N8N_VERSION",
        "ENVIRONMENT",
        "DEPLOYMENT_NAME"
      ],
      "env-overrides": {
        "PYTHONPATH": "/opt/runners/task-runner-python",
        "N8N_RUNNERS_STDLIB_ALLOW": "*",
        "N8N_RUNNERS_EXTERNAL_ALLOW": "*",
        "N8N_RUNNERS_MAX_CONCURRENCY": "3",
        "N8N_RUNNERS_HEALTH_CHECK_SERVER_HOST": "0.0.0.0"
      }
    }
  ]
}
You can and should only allow the libraries you actually use, however at some point I got so annoyed with n8n telling me that even if I built the darn Dockerfile with the lib in it and it is installed, I can not use it because the config does not list it.
The most annoying part was that Python standard libs kept getting blocked because I did not include them all…
Judge me if you must 💅
Step 3: Fire It Up
Alright, moment of truth. Make sure your file structure looks like this:
deploy/
├── docker-compose.yml
├── Dockerfile
├── n8n-task-runners.json
└── .env
(Don’t forget to create a .env file with your secrets like POSTGRES_PASSWORD and N8N_RUNNERS_AUTH_TOKEN!)
If you scroll up a little I included an example .env
cd deploy/
docker compose up -d --build
The --build flag ensures Docker builds your custom Python runner image. Grab a coffee ☕, the first build takes a minute because it’s installing all those Python packages.
Once it’s up, visit http://localhost:5678 and you should see the n8n login screen.
Bonus: What I Actually Use This For
Okay, now that you’ve got this beautiful automation platform running, let me tell you what I did with it.
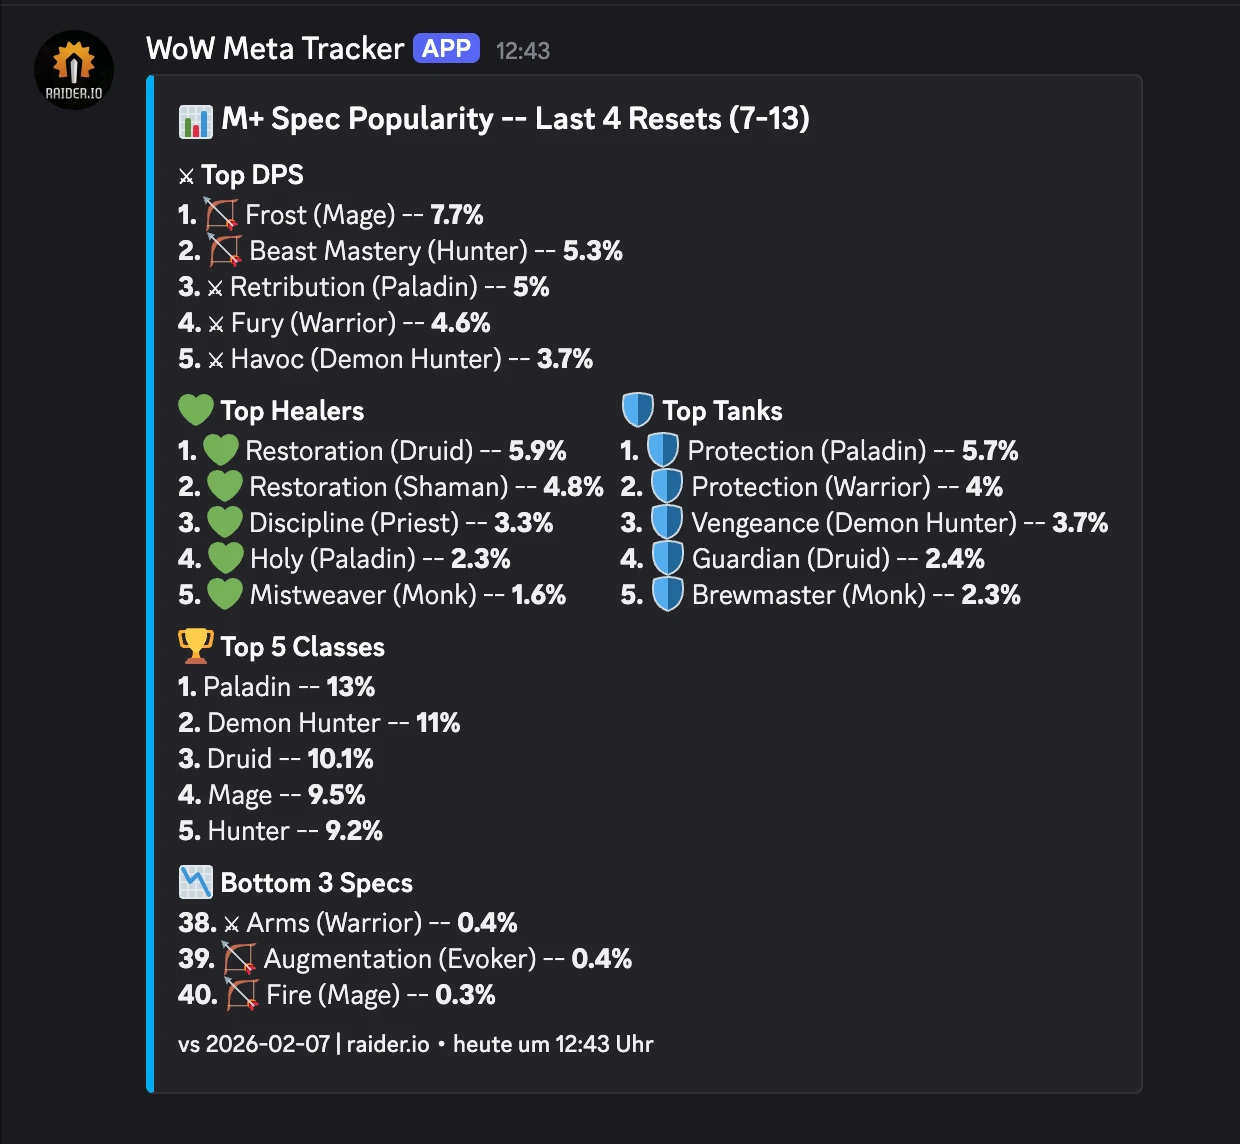
The WoW Meta Tracker
Every week, I wanted to know: which specs are dominating Mythic+ keys?
I do this because I want to play these classes so people take me with them on high keys: It be like that sometimes. In Season 2 of TWW I had a maxed out, best in slot, +3k rating guardian druid and people would not take me as their tank because it was not meta.
Here’s the n8n workflow logic:
- Schedule Trigger: Runs every Wednesday at 13:00 UTC.
- Grab data
- Prepare and store the data
- Send to Discord
I will show you some of the code I use below
# this sets the URL to fetch

BASE = "https://raider.io/stats/mythic-plus-spec-popularity"

sources = [
    {
        "label": "Last 4 Resets (7-13)",
        "scope": "last-4-resets",
        "url": BASE + "?scope=last-4-resets&minMythicLevel=7&maxMythicLevel=13&groupBy=popularity",
    },
]

results = []
for s in sources:
    results.append({"json": {
        "label": s["label"],
        "scope": s["scope"],
        "browserless_body": {
            "url": s["url"],
            "waitFor": 8000,
        },
    }})

return results
This code here actually fetches the HTML data from raider.io:
# n8n Code Node: Fetch HTML
# Calls browserless to render the raider.io page.
import requests

BROWSERLESS_URL = "http://browserless:3000/content?token=your_secret_token"

item = _items[0]["json"]

try:
    resp = requests.post(
        BROWSERLESS_URL,
        json=item["browserless_body"],
        timeout=(5, 20),
    )
    resp.raise_for_status()
    html = resp.text
except Exception as e:
    return [{"json": {
        "label": item["label"],
        "scope": item["scope"],
        "error": str(e),
    }}]

return [{"json": {
    "label": item["label"],
    "scope": item["scope"],
    "html": html,
}}]
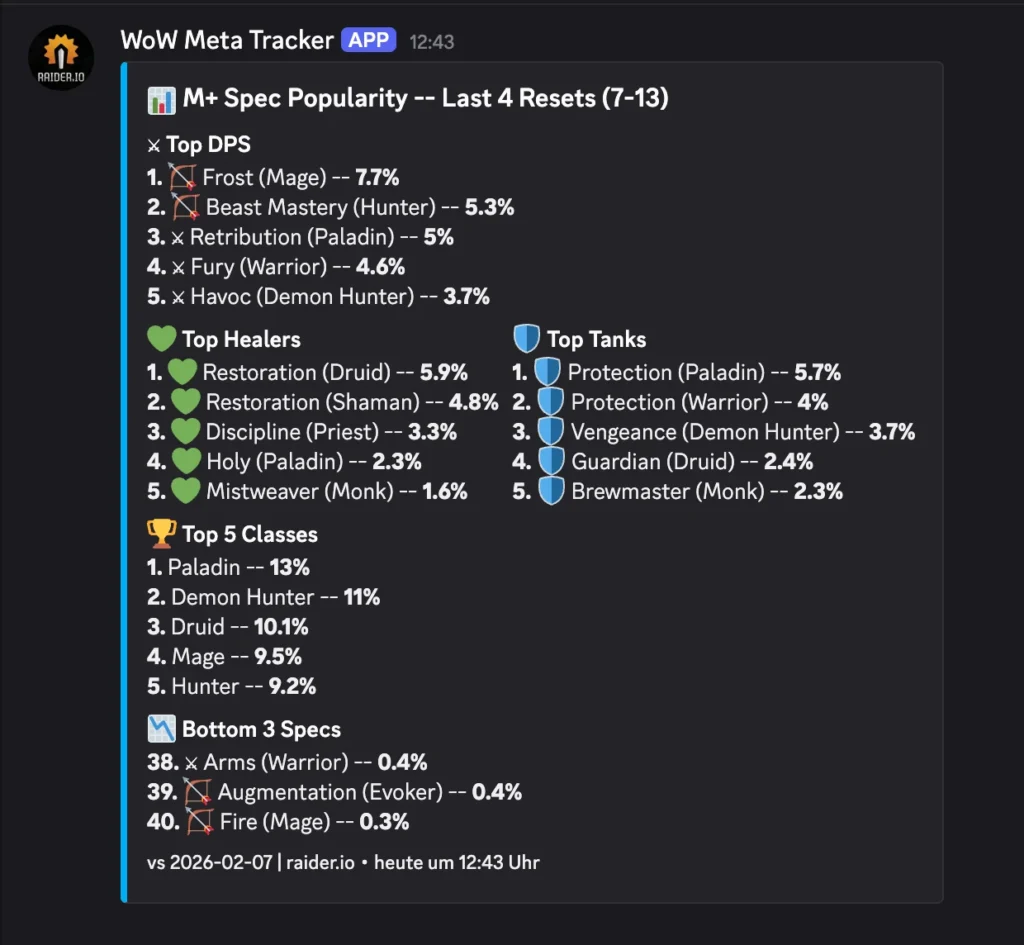
The Result:
(I just built this today, so no deltas yet)

Production Tips (For the Responsible Adults)
If you’re putting this on a real server:
- Reverse Proxy: Put n8n behind Nginx or Traefik with HTTPS. Set
N8N_PROXY_HOPS=1so n8n trusts the proxy headers. - Firewall: Don’t expose Browserless (port 3000) or the DB (port 5432) to the internet. Only port 5678 (n8n) should be accessible via your proxy.
- Secrets: Use a
.envfile. Do not hardcode passwords indocker-compose.yml. - Backups: The
postgres_datavolume holds everything. Back it up regularily.
Troubleshooting
“Python Code node doesn’t appear in n8n”
- Check if
N8N_RUNNERS_ENABLED=trueis set on the n8n container. - Check logs:
docker compose logs task-runners. It should say “Connected to broker”.
“ModuleNotFoundError: No module named ‘requests’”
- You probably didn’t set
N8N_RUNNERS_EXTERNAL_ALLOW=*in the environment variables. - Or, you modified the Dockerfile but didn’t rebuild. Run
docker compose up -d --build task-runners.
“Task timed out after 60 seconds”
- Web scraping is slow. Browserless takes time. Increase
N8N_RUNNERS_TASK_TIMEOUTto120in the docker-compose file.
Summary
You should now have a working local n8n instance with browser API and remote python task runner. You can build all sorts of cool things, automate tasks and go touch some grass sometimes with all that free time.
Thanks for reading xoxo, hugs and kisses. Sleep tight, love you 💕