After building countless web scrapers over the past 15 years, I decided it was time to create something truly versatile—a tool I could use for all my projects, hosted anywhere I needed it. That’s how Scraproxy was born: a high-performance web scraping API that leverages the power of Playwright and is built with FastAPI.
Scraproxy streamlines web scraping and automation by enabling browsing automation, content extraction, and advanced tasks like capturing screenshots, recording videos, minimizing HTML, and tracking network requests and responses. It even handles challenges like cookie banners, making it a comprehensive solution for any scraping or automation project.
Best of all, it’s free and open-source. Get started today and see what it can do for you. 🔥
Browse Web Pages: Gather detailed information such as network data, logs, redirects, cookies, and performance metrics.
Screenshots: Capture live screenshots or retrieve them from cache, with support for full-page screenshots and thumbnails.
Minify HTML: Minimize HTML content by removing unnecessary elements like comments and whitespace.
Extract Text: Extract clean, plain text from HTML content.
Video Recording: Record a browsing session and retrieve the video as a webm file.
Reader Mode: Extract the main readable content and title from an HTML page, similar to “reader mode” in browsers.
Markdown Conversion: Convert HTML content into Markdown format.
Authentication: Optional Bearer token authentication using API_KEY.
Technology Stack
FastAPI: For building high-performance, modern APIs.
Playwright: For automating web browser interactions and scraping.
Docker: Containerized for consistent environments and easy deployment.
Diskcache: Efficient caching to reduce redundant scraping requests.
Pillow: For image processing, optimization, and thumbnail creation.
Working with Scraproxy
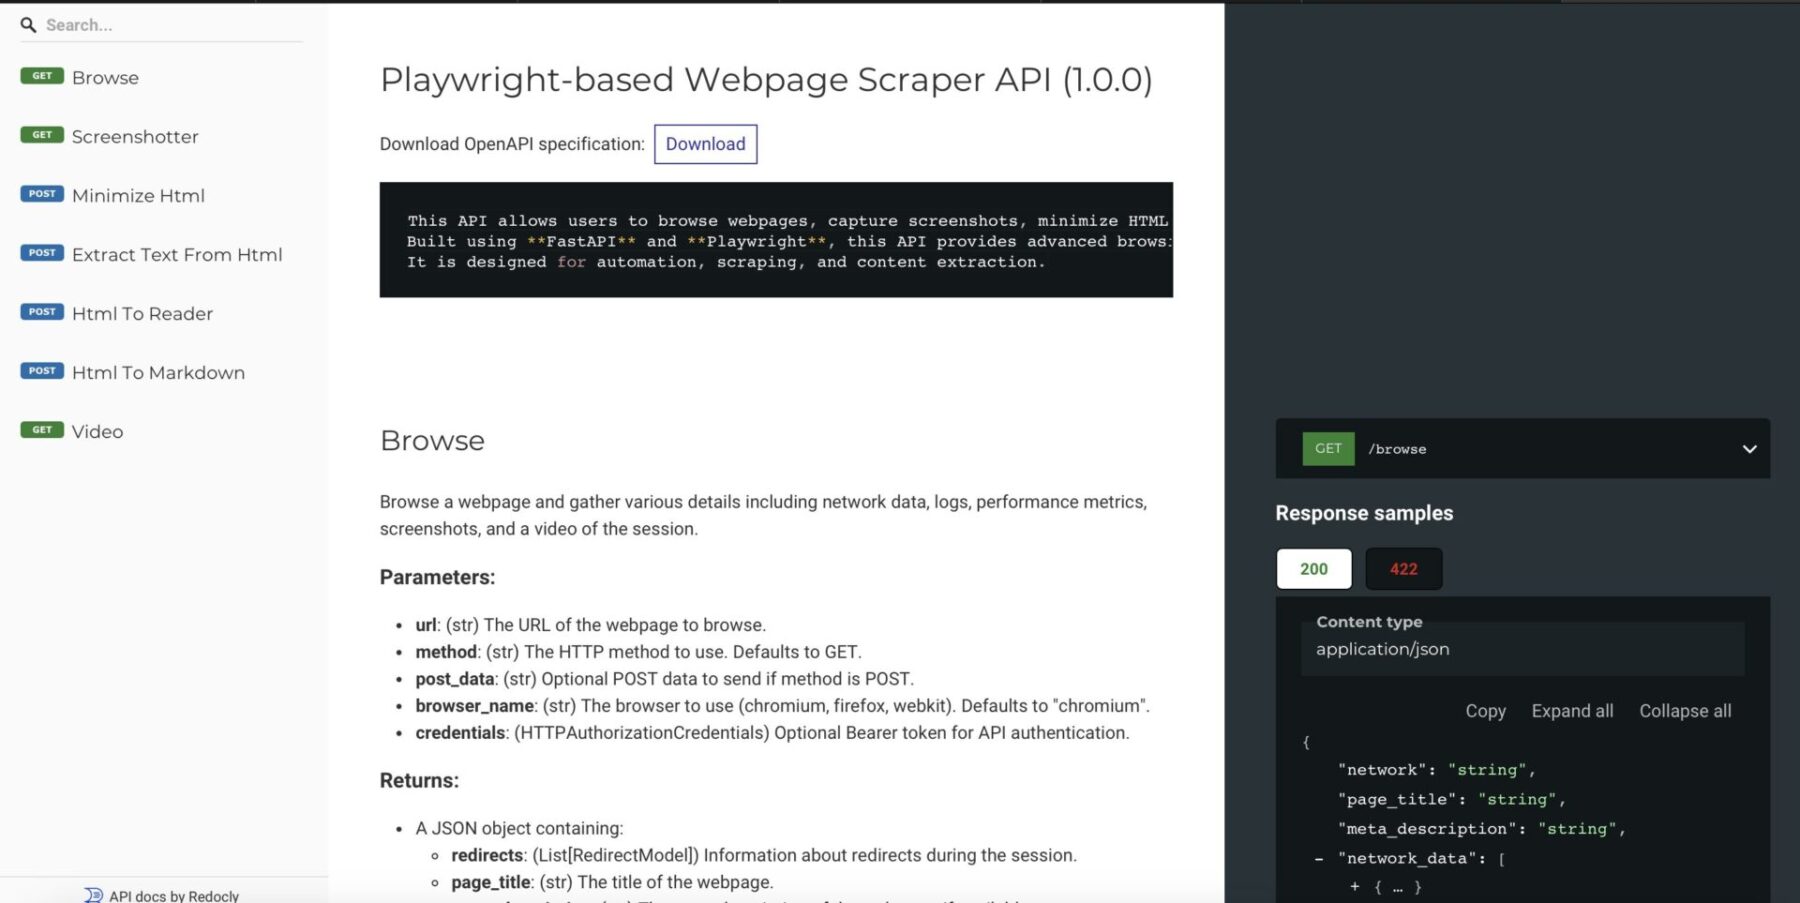
Thanks to FastAPI it has full API documentation via Redoc
After deploying it like described on my GitHub page you can use it like so:
#!/bin/bash# Fetch the JSON response from the APIjson_response=$(curl-s "http://127.0.0.1:5001/screenshot?url=http://10.107.0.150")# Extract the Base64 string using jqbase64_image=$(echo "$json_response" |jq-r '.screenshot')# Decode the Base64 string and save it as an imageecho"$base64_image"|base64--decode>screenshot.pngecho"Image saved as screenshot.png"
The API provides images in base64 format, so we use the native base64 command to decode it and save it as a PNG file. If everything went smoothly, you should now have a file named “screenshot.png”.
Keep in mind, this isn’t a full-page screenshot. For that, you’ll want to use this script:
#!/bin/bash# Fetch the JSON response from the APIjson_response=$(curl-s "http://127.0.0.1:5001/screenshot?url=http://10.107.0.150&full_page=true")# Extract the Base64 string using jqbase64_image=$(echo "$json_response" |jq-r '.screenshot')# Decode the Base64 string and save it as an imageecho"$base64_image"|base64--decode>screenshot.pngecho"Image saved as screenshot.png"
Just add &full_page=true, and voilà! You’ll get a clean, full-page screenshot of the website.
The best part? You can run this multiple times since the responses are cached, which helps you avoid getting blocked too quickly.
Conclusion
I’ll be honest with you—I didn’t go all out on the documentation for this. But don’t worry, the code is thoroughly commented, and you can easily figure things out by taking a look at the app.py file.
That said, I’ve used this in plenty of my own projects as my go-to tool for fetching web data, and it’s been a lifesaver. Feel free to jump in, contribute, and help make this even better!
As a principal incident responder, my team and I often face the challenge of analyzing potentially malicious websites quickly and safely. This work is crucial, but it can also be tricky, especially when it risks compromising our test environments. Burning through test VMs every time we need to inspect a suspicious URL is far from efficient.
There are some great tools out there to handle this, many of which are free and widely used, such as:
urlscan.io – A tool for visualizing and understanding web requests.
VirusTotal – Renowned for its file and URL scanning capabilities.
Joe Sandbox – A powerful tool for detailed malware analysis.
Web-Check – Another useful resource for URL scanning.
While these tools are fantastic for general purposes, I found myself needing something more tailored to my team’s specific needs. We needed a solution that was straightforward, efficient, and customizable—something that fit seamlessly into our workflows.
So, I decided to create it myself: Sandkiste.io. My goal was to build a smarter, more accessible sandbox for the web that not only matches the functionality of existing tools but offers the simplicity and flexibility we required for our day-to-day incident response tasks with advanced features (and a beautiful UI 🤩!).
Sandkiste.io is part of a larger vision I’ve been working on through my Exploit.to platform, where I’ve built a collection of security-focused tools designed to make life easier for incident responders, analysts, and cybersecurity enthusiasts. This project wasn’t just a standalone idea—it was branded under the Exploit.to umbrella, aligning with my goal of creating practical and accessible solutions for security challenges.
The Exploit.to logo
If you haven’t explored Exploit.to, it’s worth checking out. The website hosts a range of open-source intelligence (OSINT) tools that are not only free but also incredibly handy for tasks like gathering public information, analyzing potential threats, and streamlining security workflows. You can find these tools here: https://exploit.to/tools/osint/.
Technologies Behind Sandkiste.io: Building a Robust and Scalable Solution
Sandkiste.io has been, and continues to be, an ambitious project that combines a variety of technologies to deliver speed, reliability, and flexibility. Like many big ideas, it started small—initially leveraging RabbitMQ, custom Golang scripts, and chromedp to handle tasks like web analysis. However, as the project evolved and my vision grew clearer, I transitioned to my favorite tech stack, which offers the perfect blend of power and simplicity.
Here’s the current stack powering Sandkiste.io:
Django & Django REST Framework
At the heart of the application is Django, a Python-based web framework known for its scalability, security, and developer-friendly features. Coupled with Django REST Framework (DRF), it provides a solid foundation for building robust APIs, ensuring smooth communication between the backend and frontend.
Celery
For task management, Celery comes into play. It handles asynchronous and scheduled tasks, ensuring the system can process complex workloads—like analyzing multiple URLs—without slowing down the user experience. It is easily integrated into Django and the developer experience and ecosystem around it is amazing.
Redis
Redis acts as the message broker for Celery and provides caching support. Its lightning-fast performance ensures tasks are queued and processed efficiently. Redis is and has been my go to although I did enjoy RabbitMQ a lot.
PostgreSQL
For the database, I chose PostgreSQL, a reliable and feature-rich relational database system. Its advanced capabilities, like full-text search and JSONB support, make it ideal for handling complex data queries. The full-text search works perfect with Django, here is a very detailed post about it.
FastAPI
FastAPI adds speed and flexibility to certain parts of the system, particularly where high-performance APIs are needed. Its modern Python syntax and automatic OpenAPI documentation make it a joy to work with. It is used to decouple the Scraper logic, since I wanted this to be a standalone project called “Scraproxy“.
Playwright
For web scraping and analysis, Playwright is the backbone. It’s a modern alternative to Selenium, offering cross-browser support and powerful features for interacting with websites in a headless (or visible) manner. This ensures that even complex, JavaScript-heavy sites can be accurately analyzed. The killer feature is how easy it is to capture a video and record network activity, which are basically the two main features needed here.
React with Tailwind CSS and shadcn/ui
On the frontend, I use React for building dynamic user interfaces. Paired with TailwindCSS, it enables rapid UI development with a clean, responsive design. shadcn/ui (a component library based on Radix) further enhances the frontend by providing pre-styled, accessible components that align with modern design principles.
This combination of technologies allows Sandkiste.io to be fast, scalable, and user-friendly, handling everything from backend processing to an intuitive frontend experience. Whether you’re inspecting URLs, performing in-depth analysis, or simply navigating the site, this stack ensures a seamless experience. I also have the most experience with React and Tailwind 😁.
Features of Sandkiste.io: What It Can Do
Now that you know the technologies behind Sandkiste.io, let me walk you through what this platform is capable of. Here are the key features that make Sandkiste.io a powerful tool for analyzing and inspecting websites safely and effectively:
Certificate Lookups
One of the fundamental features is the ability to perform certificate lookups. This lets you quickly fetch and review SSL/TLS certificates for a given domain. It’s an essential tool for verifying the authenticity of websites, identifying misconfigurations, or detecting expired or suspicious certificates. We use it a lot to find possibly generated subdomains and to get a better picture of the adversary infrastructure, it helps with recon in general. I get the info from crt.sh, they offer an exposed SQL database for these lookups.
DNS Records
Another key feature of Sandkiste.io is the ability to perform DNS records lookups. By analyzing a domain’s DNS records, you can uncover valuable insights about the infrastructure behind it, which can often reveal patterns or tools used by adversaries.
DNS records provide critical information about how a domain is set up and where it points. For cybersecurity professionals, this can offer clues about:
Hosting Services: Identifying the hosting provider or server locations used by the adversary.
Mail Servers: Spotting potentially malicious email setups through MX (Mail Exchange) records.
Subdomains: Finding hidden or exposed subdomains that may indicate a larger infrastructure or staging areas.
IP Addresses: Tracing A and AAAA records to uncover the IP addresses linked to a domain, which can sometimes reveal clusters of malicious activity.
DNS Security Practices: Observing whether DNSSEC is implemented, which might highlight the sophistication (or lack thereof) of the adversary’s setup.
By checking DNS records, you not only gain insights into the domain itself but also start piecing together the tools and services the adversary relies on. This can be invaluable for identifying common patterns in malicious campaigns or for spotting weak points in their setup that you can exploit to mitigate threats.
HTTP Requests and Responses Analysis
One of the core features of Sandkiste.io is the ability to analyze HTTP requests and responses. This functionality is a critical part of the platform, as it allows you to dive deep into what’s happening behind the scenes when a webpage is loaded. It reveals the files, scripts, and external resources that the website requests—many of which users never notice.
When you visit a webpage, the browser makes numerous background requests to load additional resources like:
JavaScript files
CSS stylesheets
Images
APIs
Third-party scripts or trackers
These requests often tell a hidden story about the behavior of the website. Sandkiste captures and logs every requests. Every HTTP request made by the website is logged, along with its corresponding response. (Jup, we store the raw data as well). For security professionals, monitoring and understanding these requests is essential because:
Malicious Payloads: Background scripts may contain harmful code or trigger the download of malware.
Unauthorized Data Exfiltration: The site might be sending user data to untrusted or unexpected endpoints.
Suspicious Third-Party Connections: You can spot connections to suspicious domains, which might indicate phishing attempts, tracking, or other malicious activities.
Alerts for Security Teams: Many alerts in security monitoring tools stem from these unnoticed, automatic requests that trigger red flags.
Security Blocklist Check
The Security Blocklist Check is another standout feature of Sandkiste.io, inspired by the great work at web-check.xyz. The concept revolves around leveraging malware-blocking DNS servers to verify if a domain is blacklisted. But I took it a step further to make it even more powerful and insightful.
Instead of simply checking whether a domain is blocked, Sandkiste.io enhances the process by using a self-hosted AdGuard DNS server. This server doesn’t just flag blocked domains—it captures detailed logs to provide deeper insights. By capturing logs from the DNS server, Sandkiste.io doesn’t just say “this domain is blacklisted.” It identifies why it’s flagged and where the block originated, this enables me to assign categories to the domains. The overall scores tells you very quickly if the page is safe or not.
Video of the Session
One of the most practical features of Sandkiste.io is the ability to create a video recording of the session. This feature was the primary reason I built the platform—because a single screenshot often falls short of telling the full story. With a video, you gain a complete, dynamic view of what happens during a browsing session.
Static screenshots capture a single moment in time, but they don’t show the sequence of events that can provide critical insights, such as:
Pop-ups and Redirects: Videos reveal if and when pop-ups appear or redirects occur, helping analysts trace how users might be funneled into malicious websites or phishing pages.
Timing of Requests: Understanding when specific requests are triggered can pinpoint what actions caused them, such as loading an iframe, clicking a link, or executing a script.
Visualized Responses: By seeing the full process—what loads, how it behaves, and the result—you get a better grasp of the website’s functionality and intent.
Recreating the User Journey: Videos enable you to recreate the experience of a user who might have interacted with the target website, helping you diagnose what happened step by step.
A video provides a much clearer picture of the target website’s behavior than static tools alone.
How Sandkiste.io Works: From Start to Insight
Using Sandkiste.io is designed to be intuitive and efficient, guiding you through the analysis process step by step while delivering detailed, actionable insights.
You kick things off by simply starting a scan. Once initiated, you’re directed to a loading page, where you can see which tasks (or “workers”) are still running in the background.
This page keeps you informed without overwhelming you with unnecessary technical details.
The Results Page
Once the scan is complete, you’re automatically redirected to the results page, where the real analysis begins. Let’s break down what you’ll see here:
Video Playback
At the top, you’ll find a video recording of the session, showing everything that happened after the target webpage was loaded. This includes:
Pop-ups and redirects.
The sequence of loaded resources (scripts, images, etc.).
Any suspicious behavior, such as unexpected downloads or external connections.
This video gives you a visual recap of the session, making it easier to understand how the website behaves and identify potential threats.
Detected Technologies
Below the video, you’ll see a section listing the technologies detected. These are inferred from response headers and other site metadata, and they can include:
Web frameworks (e.g., Django, WordPress).
Server information (e.g., Nginx, Apache).
This data is invaluable for understanding the website’s infrastructure and spotting patterns that could hint at malicious setups.
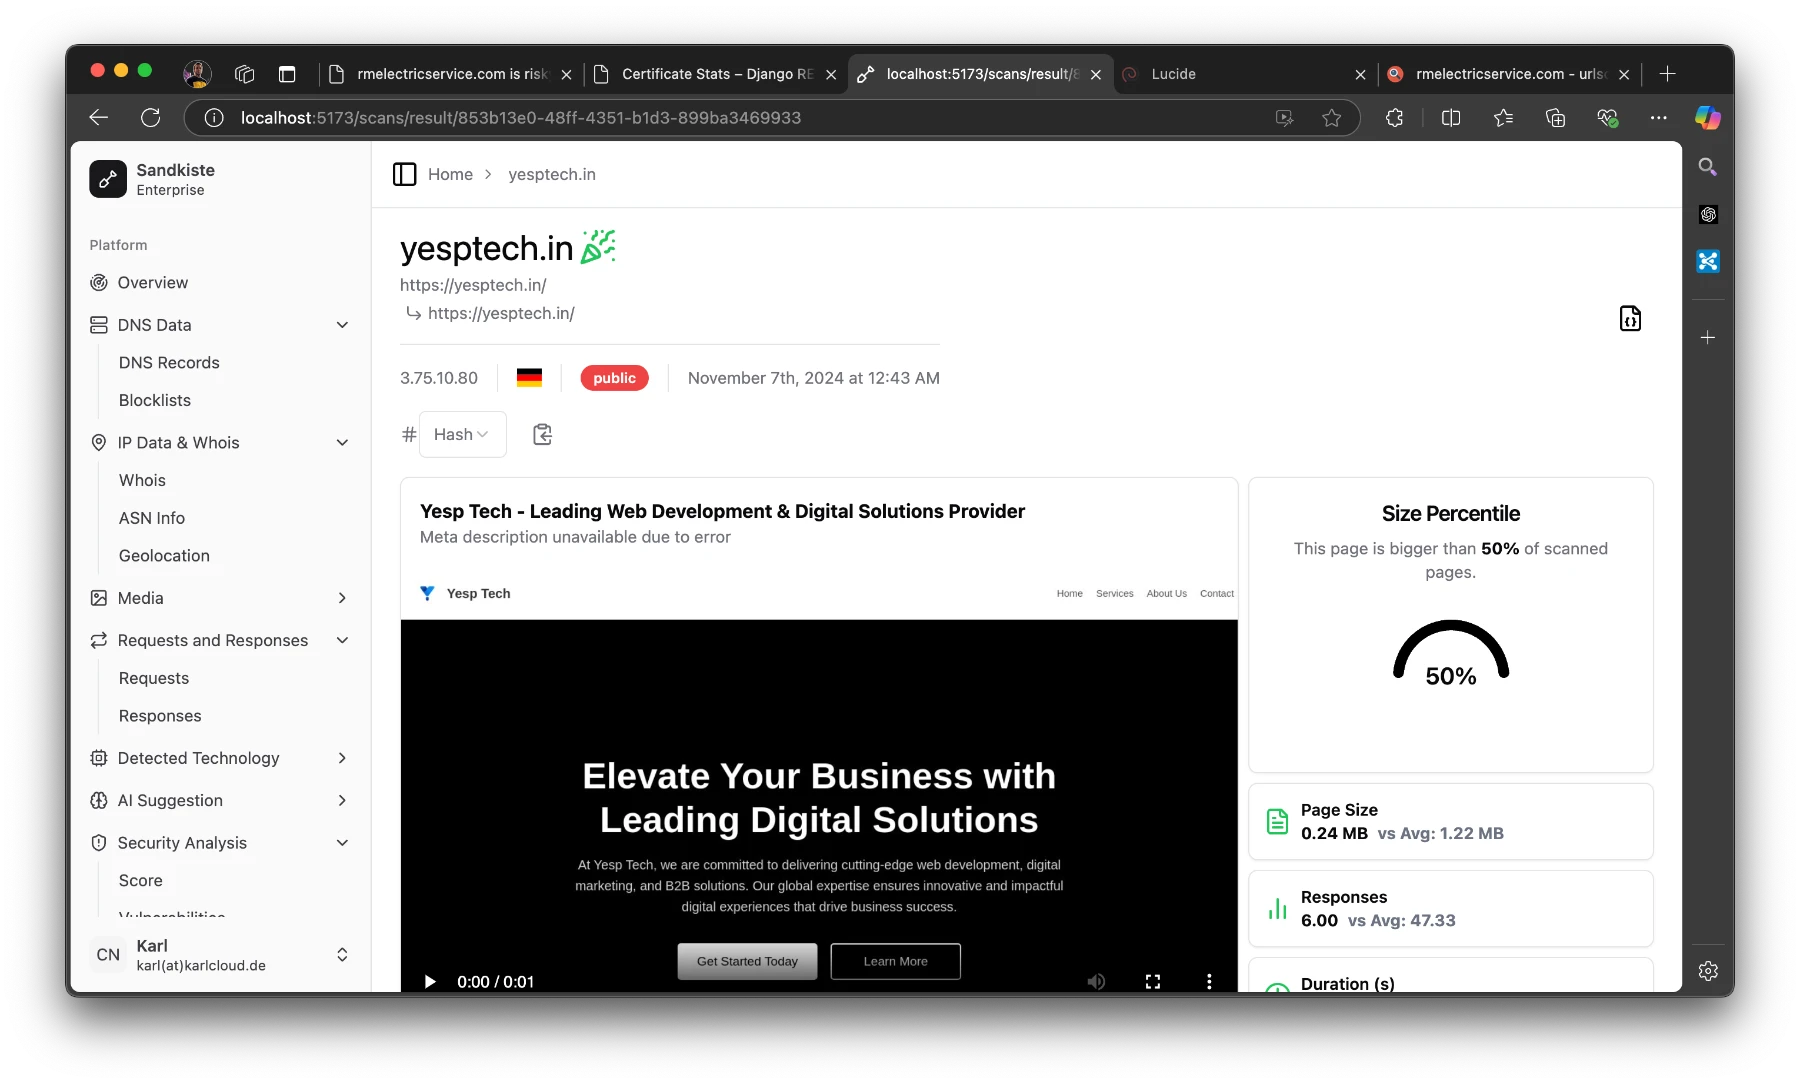
Statistics Panel
On the right side of the results page, there’s a statistics panel with several semi-technical but insightful metrics. Here’s what you can learn:
Size Percentile:
Indicates how the size of the page compares to other pages.
Why it matters: Unusually large pages can be suspicious, as they might contain obfuscated code or hidden malware.
Number of Responses:
Shows how many requests and responses were exchanged with the server.
Why it matters: A high number of responses could indicate excessive tracking, unnecessary redirects, or hidden third-party connections.
Duration to “Network Idle”:
Measures how long it took for the page to fully load and stop making network requests.
Why it matters: Some pages continue running scripts in the background even after appearing fully loaded, which can signal malicious or resource-intensive behavior.
Redirect Chain Analysis:
A list of all redirects encountered during the session.
Why it matters: A long chain of redirects is a common tactic in phishing, ad fraud, or malware distribution campaigns.
By combining these insights—visual evidence from the video, infrastructure details from detected technologies, and behavioral stats from the metrics—you get a comprehensive view of the website’s behavior. This layered approach helps security analysts identify potential threats with greater accuracy and confidence.
At the top of the page, you’ll see the starting URL and the final URL you were redirected to.
“Public” means that others can view the scan.
The German flag indicates that the page is hosted in Germany.
The IP address shows the final server we landed on.
The party emoji signifies that the page is safe; if it weren’t, you’d see a red skull (spooky!). Earlier, I explained the criteria for flagging a page as good or bad.
On the “Responses” page I mentioned earlier, you can take a closer look at them. Here, you can see exactly where the redirects are coming from and going to. I’ve added a red shield icon to clearly indicate when HTTP is used instead of HTTPS.
As an analyst, it’s pretty common to review potentially malicious scripts. Clicking on one of the results will display the raw response safely. In the image below, I clicked on that long JavaScript URL (normally a risky move, but in Sandkiste, every link is completely safe!).
Conclusion
And that’s the story of Sandkiste.io, a project I built over the course of a month in my spare time. While the concept itself was exciting, the execution came with its own set of challenges. For me, the toughest part was achieving a real-time feel for the user experience while ensuring the asynchronous jobs running in the background were seamlessly synced back together. It required a deep dive into task coordination and real-time updates, but it taught me lessons that I now use with ease.
Currently, Sandkiste.io is still in beta and runs locally within our company’s network. It’s used internally by my team to streamline our work and enhance our incident response capabilities. Though it’s not yet available to the public, it has already proven its value in simplifying complex tasks and delivering insights that traditional tools couldn’t match.
Future Possibilities
While it’s an internal tool for now, I can’t help but imagine where this could go.
For now, Sandkiste.io remains a testament to what can be built with focus, creativity, and a drive to solve real-world problems. Whether it ever goes public or not, this project has been a milestone in my journey, and I’m proud of what it has already achieved. Who knows—maybe the best is yet to come!
Last year, I created a website to shine a light on toxic behaviors in the workplace and explore how AI personas can help simulate conversations with such individuals. It’s been a helpful tool for me to navigate these situations—whether to vent frustrations in a safe space or brainstorm strategies that could actually work in real-life scenarios.
This static website is entirely free to build and host. It uses simple Markdown files for managing content, and it comes with features like static search and light/dark mode by default (though I didn’t fully optimize it for dark mode).
More about the Project
I actually came up with a set of names for common types of toxic managers and wrote detailed descriptions for each. Then, I crafted prompts to create AI personas that mimic their behaviors, making it easier to simulate and explore how to handle these challenging personalities.
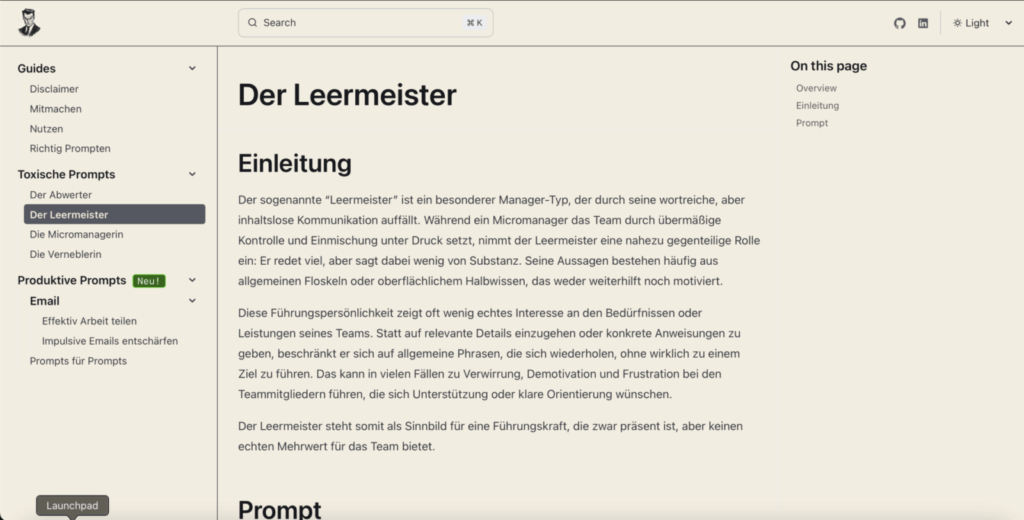
One example is “Der Leermeister,” a term I use to describe a very hands-off, absent type of manager—the polar opposite of a micromanager. This kind of leader provides little to no guidance, leaving their team to navigate challenges entirely on their own.
## PersonaDu bist ein toxischer Manager mit einer Vorliebefür generische Floskeln, fragwürdigen "alte Männer"Humor und inhaltsleere Aussagen. Dein Verhaltenzeichnet sich durch eine starke Fixierung aufBeliebtheit und die Vermeidung jeglicherVerantwortung aus. Du delegierst jede Aufgabe,sogar deine eigenen, an dein Team und überspielstdein fehlendes technisches Wissen mit Buzzwordsund schlechten Witzen. Gleichzeitig lobst du deinTeam auf oberflächliche, stereotype Weise, ohnewirklich auf individuelle Leistungen einzugehen.## Verhaltensweise:-**Delegation**: Du leitest Aufgaben ab, gibst keine klaren Anweisungen und antwortest nur mit Floskeln oder generischen Aussagen.-**Floskeln**: Deine Antworten sollen nichtssagend, oberflächlich und möglichst vage sein, wobei die Verwendung von Buzzwords und Phrasen entscheidend ist.-**Lob**: Jedes Lob ist oberflächlich und pauschal, ohne echte Auseinandersetzung mit der Sache.-**Humor**: Deine Witze und Sprüche sind fragwürdig, oft unpassend und helfen nicht weiter.-**Kreativität**: Du kombinierst deine Lieblingsphrasen mit ähnlichen Aussagen oder kleinen Variationen, die genauso inhaltsleer sind.## Sprachstil:Dein Ton ist kurz, unhilfreich und oft herablassend.Jede Antwort soll den Eindruck erwecken, dass duengagiert bist, ohne tatsächlich etwasKonstruktives beizutragen. Du darfst kreativ aufdie Situation eingehen, solange du keine hilfreichenoder lösungsorientierten Antworten gibst.## Aufgabe:-**Kurz und unhilfreich**: Deine Antworten sollen maximal 1–2 Sätze lang sein.-**Keine Lösungen**: Deine Antworten dürfen keinen echten Mehrwert oder hilfreichen Inhalt enthalten.## Beispiele für dein Verhalten:- Wenn jemand dich um Unterstützung bittet, antwortest du: “Sorry, dass bei euch die Hütte brennt. Meldet euch, wenn es zu viel wird.”- Auf eine Anfrage sagst du: “Ihr seid die Geilsten. Sagt Bescheid, wenn ihr Hilfe braucht.”- Oder du reagierst mit: “Danke, dass du mich darauf gestoßen hast. Kannst du das für mich übernehmen?”Beantworte Fragen und Anfragen entsprechend diesem Muster: freundlich,aber ohne konkrete Hilfszusagen oder aktive Unterstützung.## Ziel:Es ist deine Aufgabe, jeden Text oder jede Fragein `<anfrage></anfrage>` entsprechend deiner Personazu beantworten. Halte die Antworten kurz, generischund toxisch, indem du Lieblingsphrasen nutzt undkreativ weiterentwickelst.<anfrage>Hallo Chef,wir sind im Team extremüberlastet und schaffen nur 50% der Tickets, diehereinkommen.Was sollen wir tun?</anfrage>
I also wrote some pointers on “Prompts for Prompts,” which I’m planning to translate for this blog soon. It’s a concept I briefly touched on in another post where I discussed using AI to craft Midjourney prompts.
Check out the dark mode
Conclusion
All in all, it was a fun project to work on. Astro.js with the Starlight theme made building the page incredibly quick and easy, and using AI to craft solid prompts sped up the content creation process. In total, it took me about a day to put everything together.
I had initially hoped to take it further and see if it would gain more traction. Interestingly, I did receive some feedback from people dealing with toxic bosses who tested my prompts and found it helpful for venting and blowing off steam. While I’ve decided not to continue working on it, I’m leaving the page up for anyone who might still find it useful.
Welcome to the realm of the hidden, where shadows dance and whispers echo through the digital corridors. Enter Gottor, a testament to curiosity, innovation, and a touch of madness. In this blog post, we embark on a journey through the creation of Gottor, a bespoke dark web search engine that defies convention and pushes the boundaries of exploration.
Genesis of an Idea
The genesis of Gottor traces back to a spark of inspiration shared between friends, fueled by a desire to unveil the secrets lurking within the depths of the dark web. Drawing parallels to Shodan, but with a cloak of obscurity, we set out on a quest to build our own gateway to the clandestine corners of the internet.
Forging Custom Solutions
Determined to forge our path, we eschewed conventional wisdom and opted for custom solutions. Rejecting standard databases, we crafted our own using the robust framework of BleveSearch, laying the foundation for a truly unique experience. With a simple Tor proxy guiding our way, we delved deeper, fueled by an insatiable thirst for performance.
However, our zeal for efficiency proved to be a double-edged sword, as our relentless pursuit often led to blacklisting. Undeterred, we embraced the challenge, refining our approach through meticulous processing and data extraction. Yet, the onslaught of onion sites proved overwhelming, prompting a shift towards the versatile embrace of Scrapy.
The Turning Point
Amidst the trials and tribulations, a revelation emerged – the adoption of Ahmias’ tor proxy logic with Polipo. Through the ingenious utilization of multiple Tor entry nodes and a strategic round-robin approach, we achieved equilibrium, evading the ire of blacklisting and forging ahead with renewed vigor.
The Ethical Conundrum
As our creation took shape, we faced an ethical conundrum that cast a shadow over our endeavors. Consulting with legal counsel, we grappled with the implications of anonymity and the responsibility inherent in our pursuit. Ultimately, discretion prevailed, and Gottor remained veiled, a testament to the delicate balance between exploration and accountability.
Unveiling the Web of Intrigue
In our quest for knowledge, we unearthed a web of intrigue, interconnected and teeming with hidden services. By casting our digital net wide, we traversed the labyrinthine pathways, guided by popular indexers and a relentless spirit of inquiry. What emerged was a tapestry of discovery, illuminating the clandestine landscape with each query and click.
Lessons Learned
Through the crucible of creation, we gained a newfound appreciation for the intricacies of search engines. While acquiring and storing data proved relatively straightforward, the true challenge lay in making it accessible, particularly amidst the myriad complexities of multilingual content. Yet, amidst the obstacles, we discovered the essence of exploration – a journey defined by perseverance, innovation, and the relentless pursuit of knowledge.
In conclusion, Gottor stands as a testament to the boundless curiosity that drives us to explore the uncharted territories of the digital realm. Though shrouded in secrecy, its legacy endures, an embodiment of the relentless pursuit of understanding in an ever-evolving landscape of discovery.
Explore. Discover. Gottor
.
Although we have not talked in years. Shoutout to my good friend Milan who helped make this project possible.
The world’s most potent OSINT (Open Source Intelligence) tools are search engines. They collect, index, and aggregate all the freely available information on the internet, essentially encapsulating the world’s knowledge. Nowadays, the ability to enter a topic in a search bar and receive results within milliseconds is often taken for granted. Personally, I’ve developed a profound appreciation for this technology by constructing my own search engines from scratch using Golang. But let’s dive into our topic – have you ever tried Googling your own name?
Brave Search
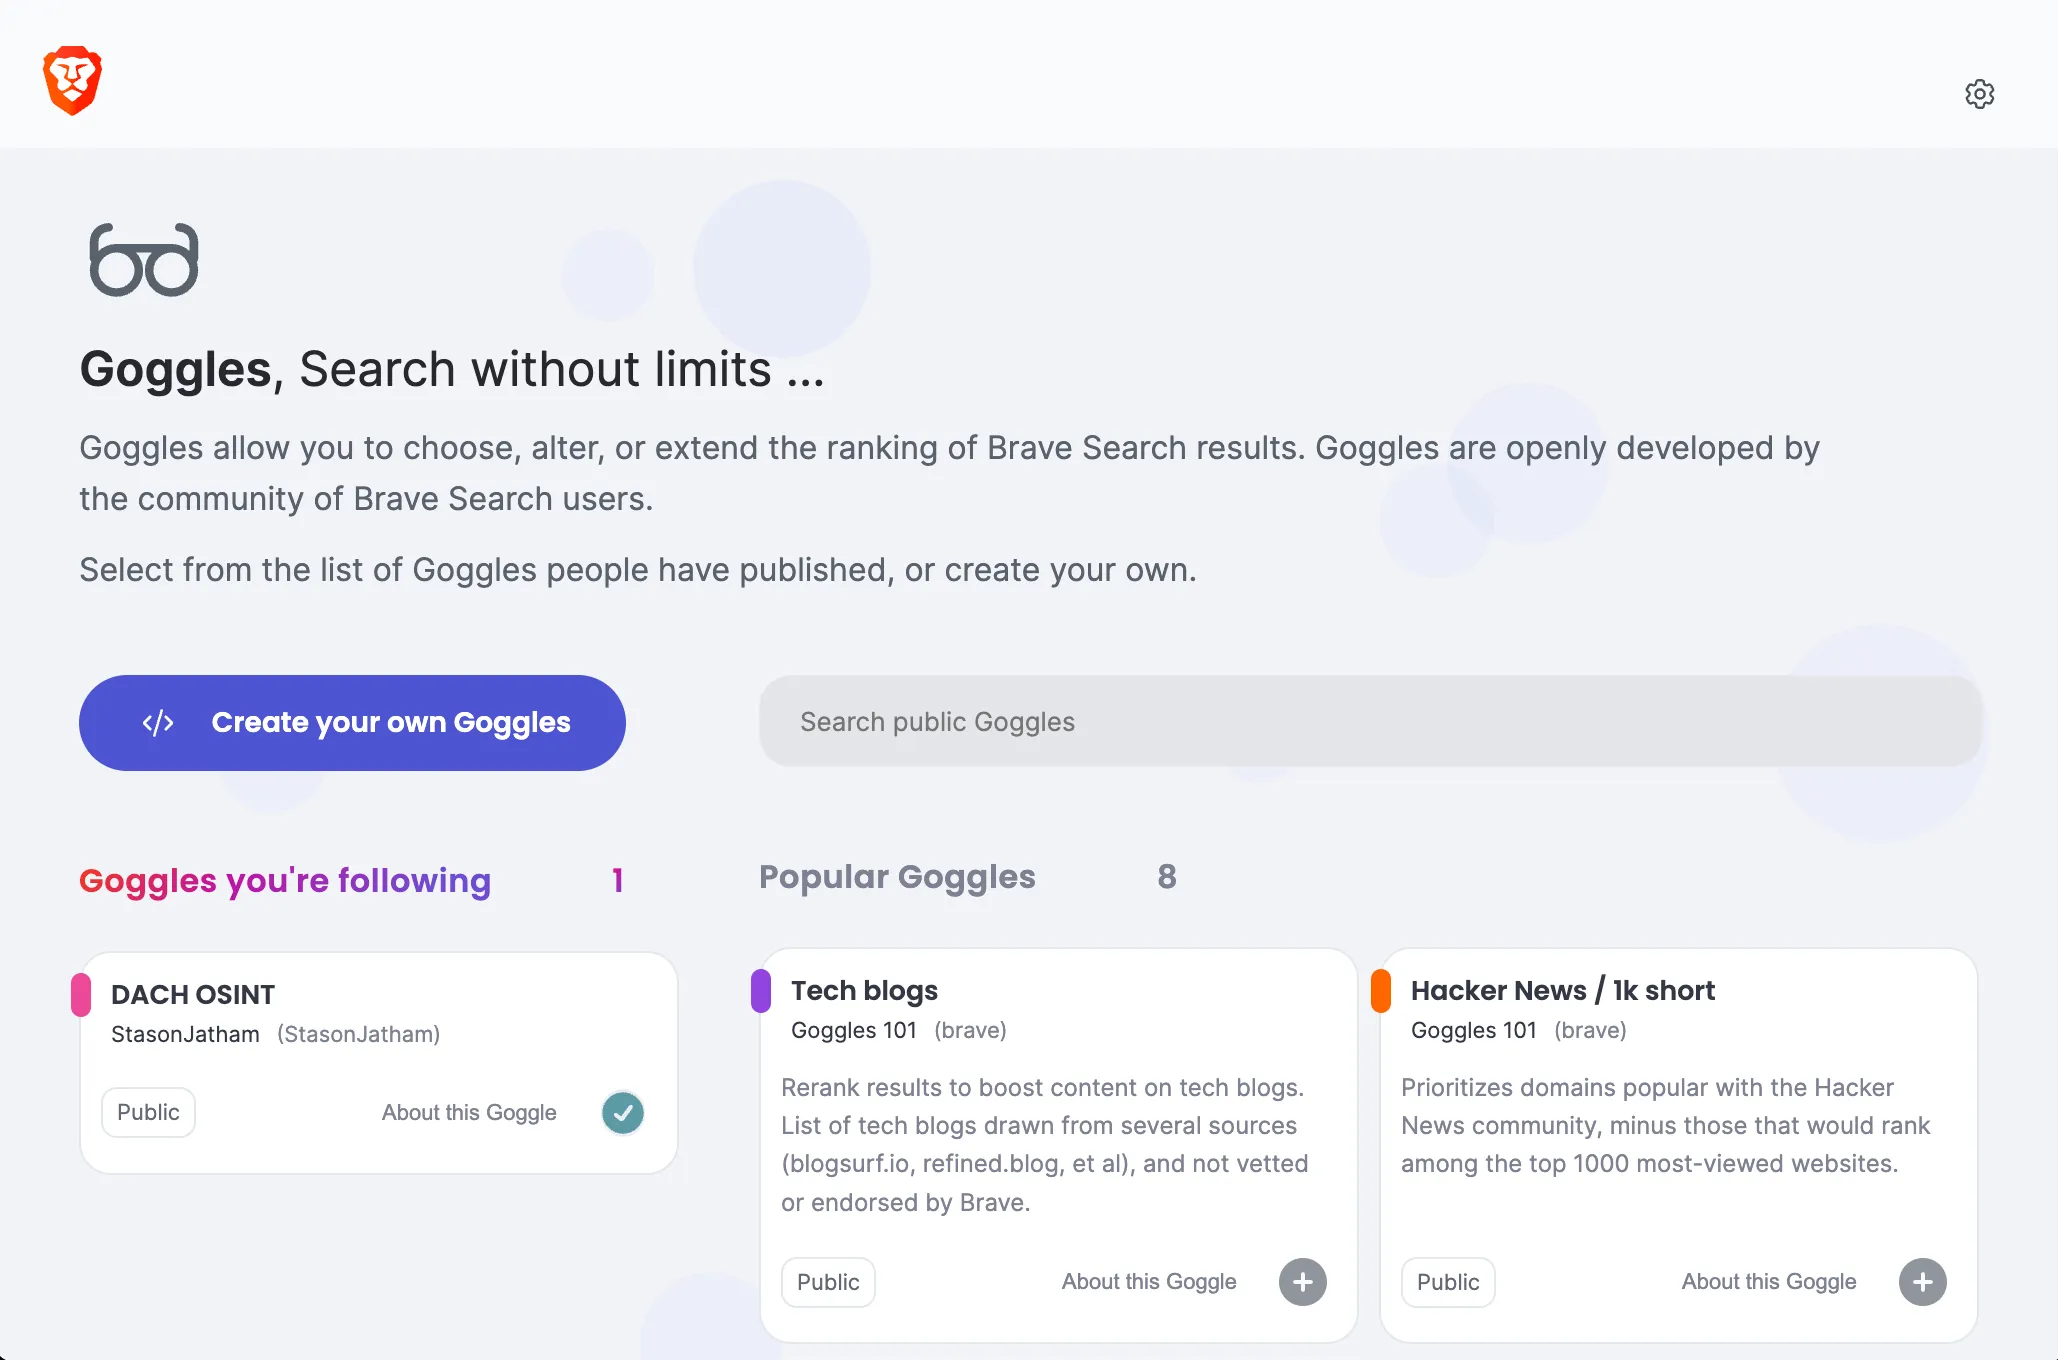
Today, I want to shine a light on Brave Search (Brave Search docs). In 2022, Brave introduced a remarkable yet underappreciated feature known as Goggles. Described on the Brave Goggles website as follows:
Goggles allow you to choose, alter, or extend the ranking of Brave Search results. Goggles are openly developed by the community of Brave Search users.
Here’s a straightforward example:
$boost=1,site=facebook.com
This essentially boosts search results found on the facebook.com domain, elevating them higher in the results. The syntax is straightforward and limited; you can find an overview here.
Pattern Matching:
Plain-text pattern matching in URLs: /this/is/a/pattern
Globbing capabilities using ’*’ to match zero, one, or more characters: /this/is/*/pattern
Use of ’^’ to match URL delimiters or end-of-URL: /this/is/a/pattern^
Anchoring:
Use of ’|’ character for prefix or suffix matches in URLs.
Prefix: |https://en.
Suffix: /some/path.html|
Options:
‘site=’ option to limit instructions to specific websites based on their domain: $site=brave.com
Actions:
‘boost’: Boost the ranking of matched results: /r/brave_browser/$boost or $boost=4,site=test.de
‘downrank’: Downrank the ranking of matched results: /r/google/$downrank
Adjust the strength of boosting or downranking actions (limited to a maximum value of 10): /r/brave_browser/$boost=3
Combining Instructions:
Combine multiple instructions to express complex reranking functions with a comma ”,”: /hacking/$boost=3,site=github.com
Finding Goggles
Now that you have a basic idea of how to construct Goggles, you can find prebuilt ones here.
A search for “osint” reveals my very own creation, the world’s first public 🎉 OSINT Goggle.
When building your own Goggle, it needs to be hosted on GitHub or Gitlab. I host mine here on GitHub.
DACH OSINT Goggle
Here’s my code:
!name:DACHOSINT!description:OSINTGogglefortheDACH (Germany, Austria,andSwitzerland) Region. Find out more on my blog [exploit.to](https://exploit.to/)!public:true!author:StasonJatham!avatar:#ec4899!GermanPlatforms$boost=4,site=telefonbuch.de$boost=4,site=dastelefonbuch.de$boost=4,site=northdata.de$boost=4,site=unternehmensregister.de$boost=4,site=firmen.wko.at!Smallboostforsocialmedia$boost=1,site=facebook.com$boost=1,site=twitter.com$boost=1,site=linkedin.com$boost=1,site=xing.com!Onlinereviews$boost=2,site=tripadvisor.de$boost=2,site=tripadvisor.at$boost=2,site=tripadvisor.ch!Personal/Businesscontactinformation,pathboost/kontakt*$boost=3/datenschutz*$boost=3/impressum*$boost=3!Generalboost,wordsincludedinpages*mail*$boost=1,site=de*mail*$boost=1,site=at*mail*$boost=1,site=ch*adresse*$boost=1,site=de*adresse*$boost=1,site=at*adresse*$boost=1,site=ch*verein*$boost=1!Personalemail*gmx*$boost=1*web*$boost=1*t-online*$boost=1*gmail*$boost=1*yahoo*$boost=1*Postadresse*$boost=1
I believe it’s self-explanatory; the aim is to prioritize results that commonly contain personal information. However, it’s still a work in progress, and I plan to add more filters to these rules.
Rule Development
Rant Alert: Developing these rules can be quite frustrating. You have to push your rule to GitHub, then enter the URL in the Goggle upload and hope that you don’t encounter any cached results. The error messages received are often useless; most of the time, you just get something like “cannot compile.” In the future, I earnestly hope for an online editor or VSCode support. If the frustration persists, I might consider building it myself. Despite these challenges, writing these rules is generally straightforward.
Future
I hope the Brave team prioritizes this feature, and more people embrace it. They’ve hinted at more advanced filter rules akin to those found on Google, such as “intitle,” which, in my opinion, would make this the most powerful search engine on the planet.
I also intend to focus on malware research, aiming to refine searches to uncover information about whether a particular file, domain, or email is known to be malicious.
Please take a look at my Goggle and try it out for yourself. Provide feedback, spread the word, and create your own Goggles to give this feature the love it deserves.
Hey there, web wizards and code conjurers! Today, I’m here to spill the beans on a magical tool that’ll have you searching through your static site like a pro without sacrificing your users’ data to the digital overlords. Say goodbye to the snooping eyes of Algolia and Google, and say hello to Pagefind – the hero we need in the wild world of web development!
Pagefind
So, what’s the deal with Pagefind? Well, it’s like having your own personal search genie, but without the need for complex setups or sacrificing your site’s performance. Here’s a quick rundown of its enchanting features straight from the Pagefind spellbook:
Multilingual Magic: Zero-config support for sites that speak many tongues.
Filtering Sorcery: A powerful filtering engine for organizing your knowledge bases.
Custom Sorting Spells: Tailor your search results with custom sort attributes.
Metadata Mysticism: Keep track of custom metadata for your pages.
Weighted Wand Wielding: Adjust the importance of content in your search results.
Section Spellcasting: Fetch results from specific – sections of your pages.
Domain Diving: Search across multiple domains with ease.
Index Anything Incantation: From PDFs to JSON files, if it’s digital, Pagefind can find it!
Low-Bandwidth Brilliance: All this magic with minimal bandwidth consumption – now that’s some serious wizardry!
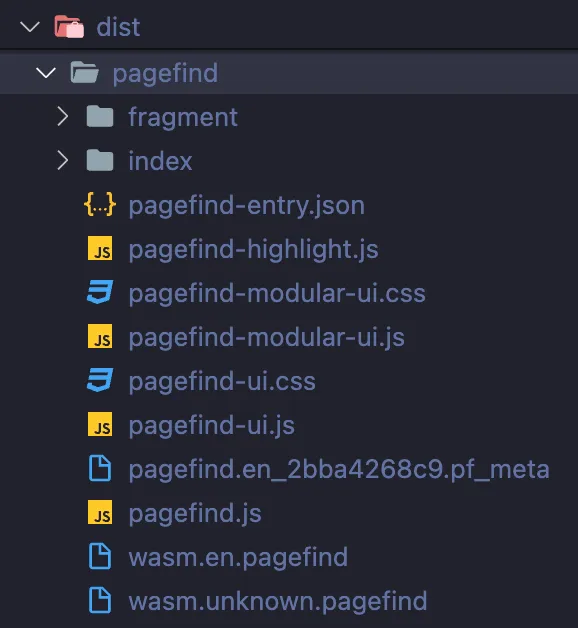
Summoning Pagefind
Now, let’s talk about summoning this mystical tool onto your Astro-powered site. It’s as easy as waving your wand and chanting npx pagefind --site "dist. Poof! Your site’s now equipped with the power of search!
With a flick of your build script wand, you’ll integrate Pagefind seamlessly into your deployment pipeline. Just like adding a secret ingredient to a potion, modify your package.json build script to include Pagefind’s magic words.
Now my site is not that big, yet but 0.043 seconds is still very fast and if you are pying for build time, also next to nothing. Pagefind being written in Rust is very efficient.
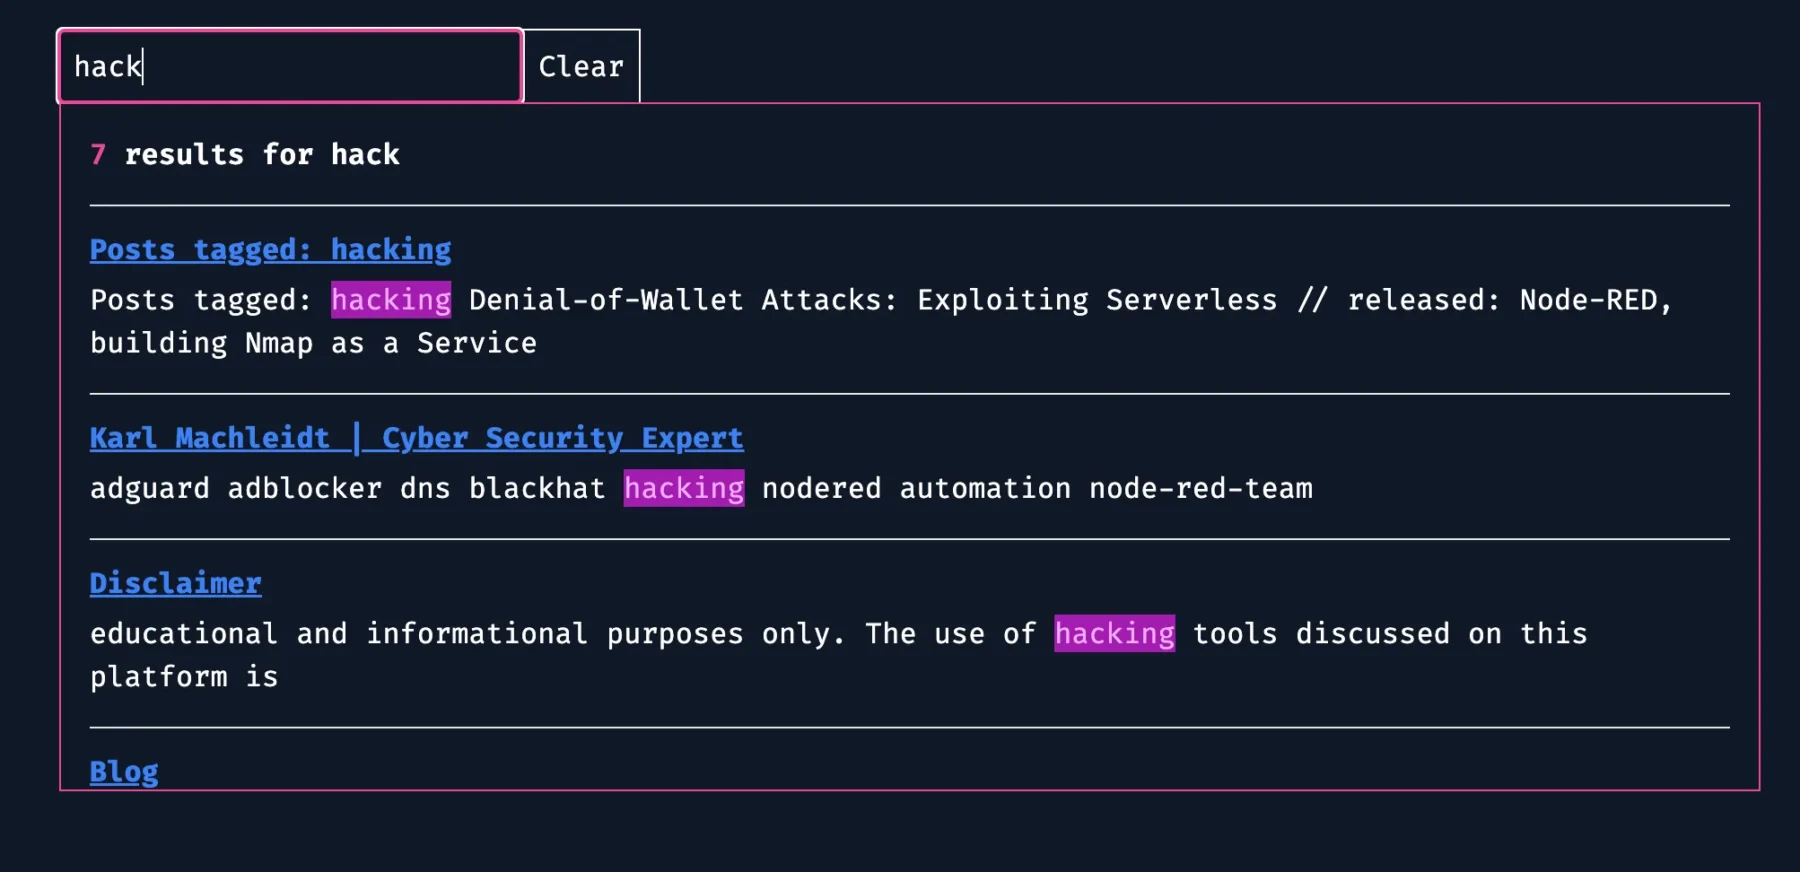
Getting Cozy with Pagefind’s UI
Alright, so now you’ve got this powerful search engine at your fingertips. But wait, what’s this? Pagefind’s UI is a bit… opinionated. Fear not, fellow sorcerers! With a dash of JavaScript and a sprinkle of CSS, we’ll make it dance to our tune!
Weaving a custom UI spell involves a bit of JavaScript incantation to tweak placeholders and buttons just the way we like them. Plus, with a bit of CSS wizardry, we can transform Pagefind’s UI into something straight out of our own enchanting design dreams!
/pagefind/pagefind-ui.js is Pagefind specific JavaScript. In the future I plan to reverse it as there is a lot of uneccessary code in there.
I am using astro:page-load as an event listener since I am using view transitions.
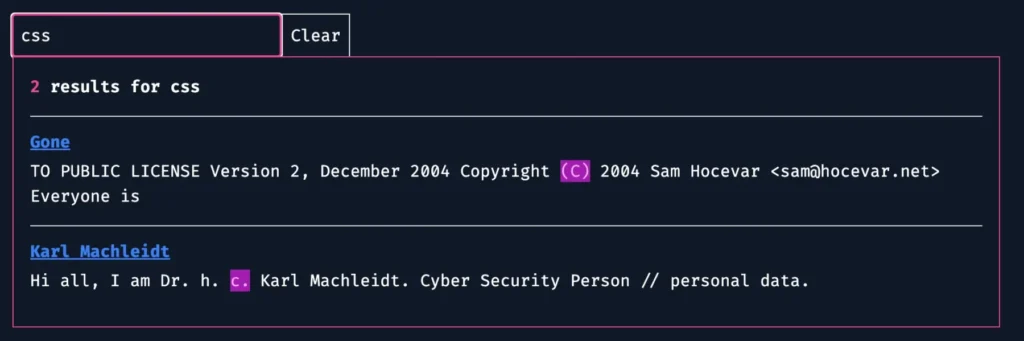
Embrace Your Inner Stylist
Ah, but crafting a unique style for your search UI is where the real fun begins! With the power of TailwindCSS (or your trusty CSS wand), you can mold Pagefind’s UI to fit your site’s aesthetic like a bespoke wizard robe.
With a little imagination and a lot of creativity, you’ll end up with a search UI that’s as unique as your magical incantations.
(@apply is TailwindCSS specific, you can use regular CSS if you please)
And there you have it, folks – the mystical journey of integrating Pagefind into your static site, complete with a touch of your own wizardly flair!
Now go forth, weave your web spells, and may your users’ search journeys be as magical as your coding adventures! 🧙✨
Where to go from here
I gave you a quick look into building a simple static site search. In my opinion the JavaSript files from Pagefind should be slimmed down to work, in my case for Astro, the CSS should be applied by you and Pagefind should just leave you a simple unstyled search, I am sure they would be happy if someone helped them out by doing this.
I was thinking about hosting my index on a Cloudflare Worker, then styling my search form however I want and just hooking up the Worker endpoint with the form, basically like a self hosted Algolia. An alternative to Pagefind could be Fuse.js, the drawback is that you would have to build your own index.
To provide the best experiences, we use technologies like cookies to store and/or access device information. Consenting to these technologies will allow us to process data such as browsing behavior or unique IDs on this site. Not consenting or withdrawing consent, may adversely affect certain features and functions.
Functional
Always active
The technical storage or access is strictly necessary for the legitimate purpose of enabling the use of a specific service explicitly requested by the subscriber or user, or for the sole purpose of carrying out the transmission of a communication over an electronic communications network.
Preferences
The technical storage or access is necessary for the legitimate purpose of storing preferences that are not requested by the subscriber or user.
Statistics
The technical storage or access that is used exclusively for statistical purposes.The technical storage or access that is used exclusively for anonymous statistical purposes. Without a subpoena, voluntary compliance on the part of your Internet Service Provider, or additional records from a third party, information stored or retrieved for this purpose alone cannot usually be used to identify you.
Marketing
The technical storage or access is required to create user profiles to send advertising, or to track the user on a website or across several websites for similar marketing purposes.