Tag: sysadmin

  • My Home Server: “PrettyLittleKitten” – A Personal Tech Haven

    My Home Server: “PrettyLittleKitten” – A Personal Tech Haven

    Hardware

    RAM

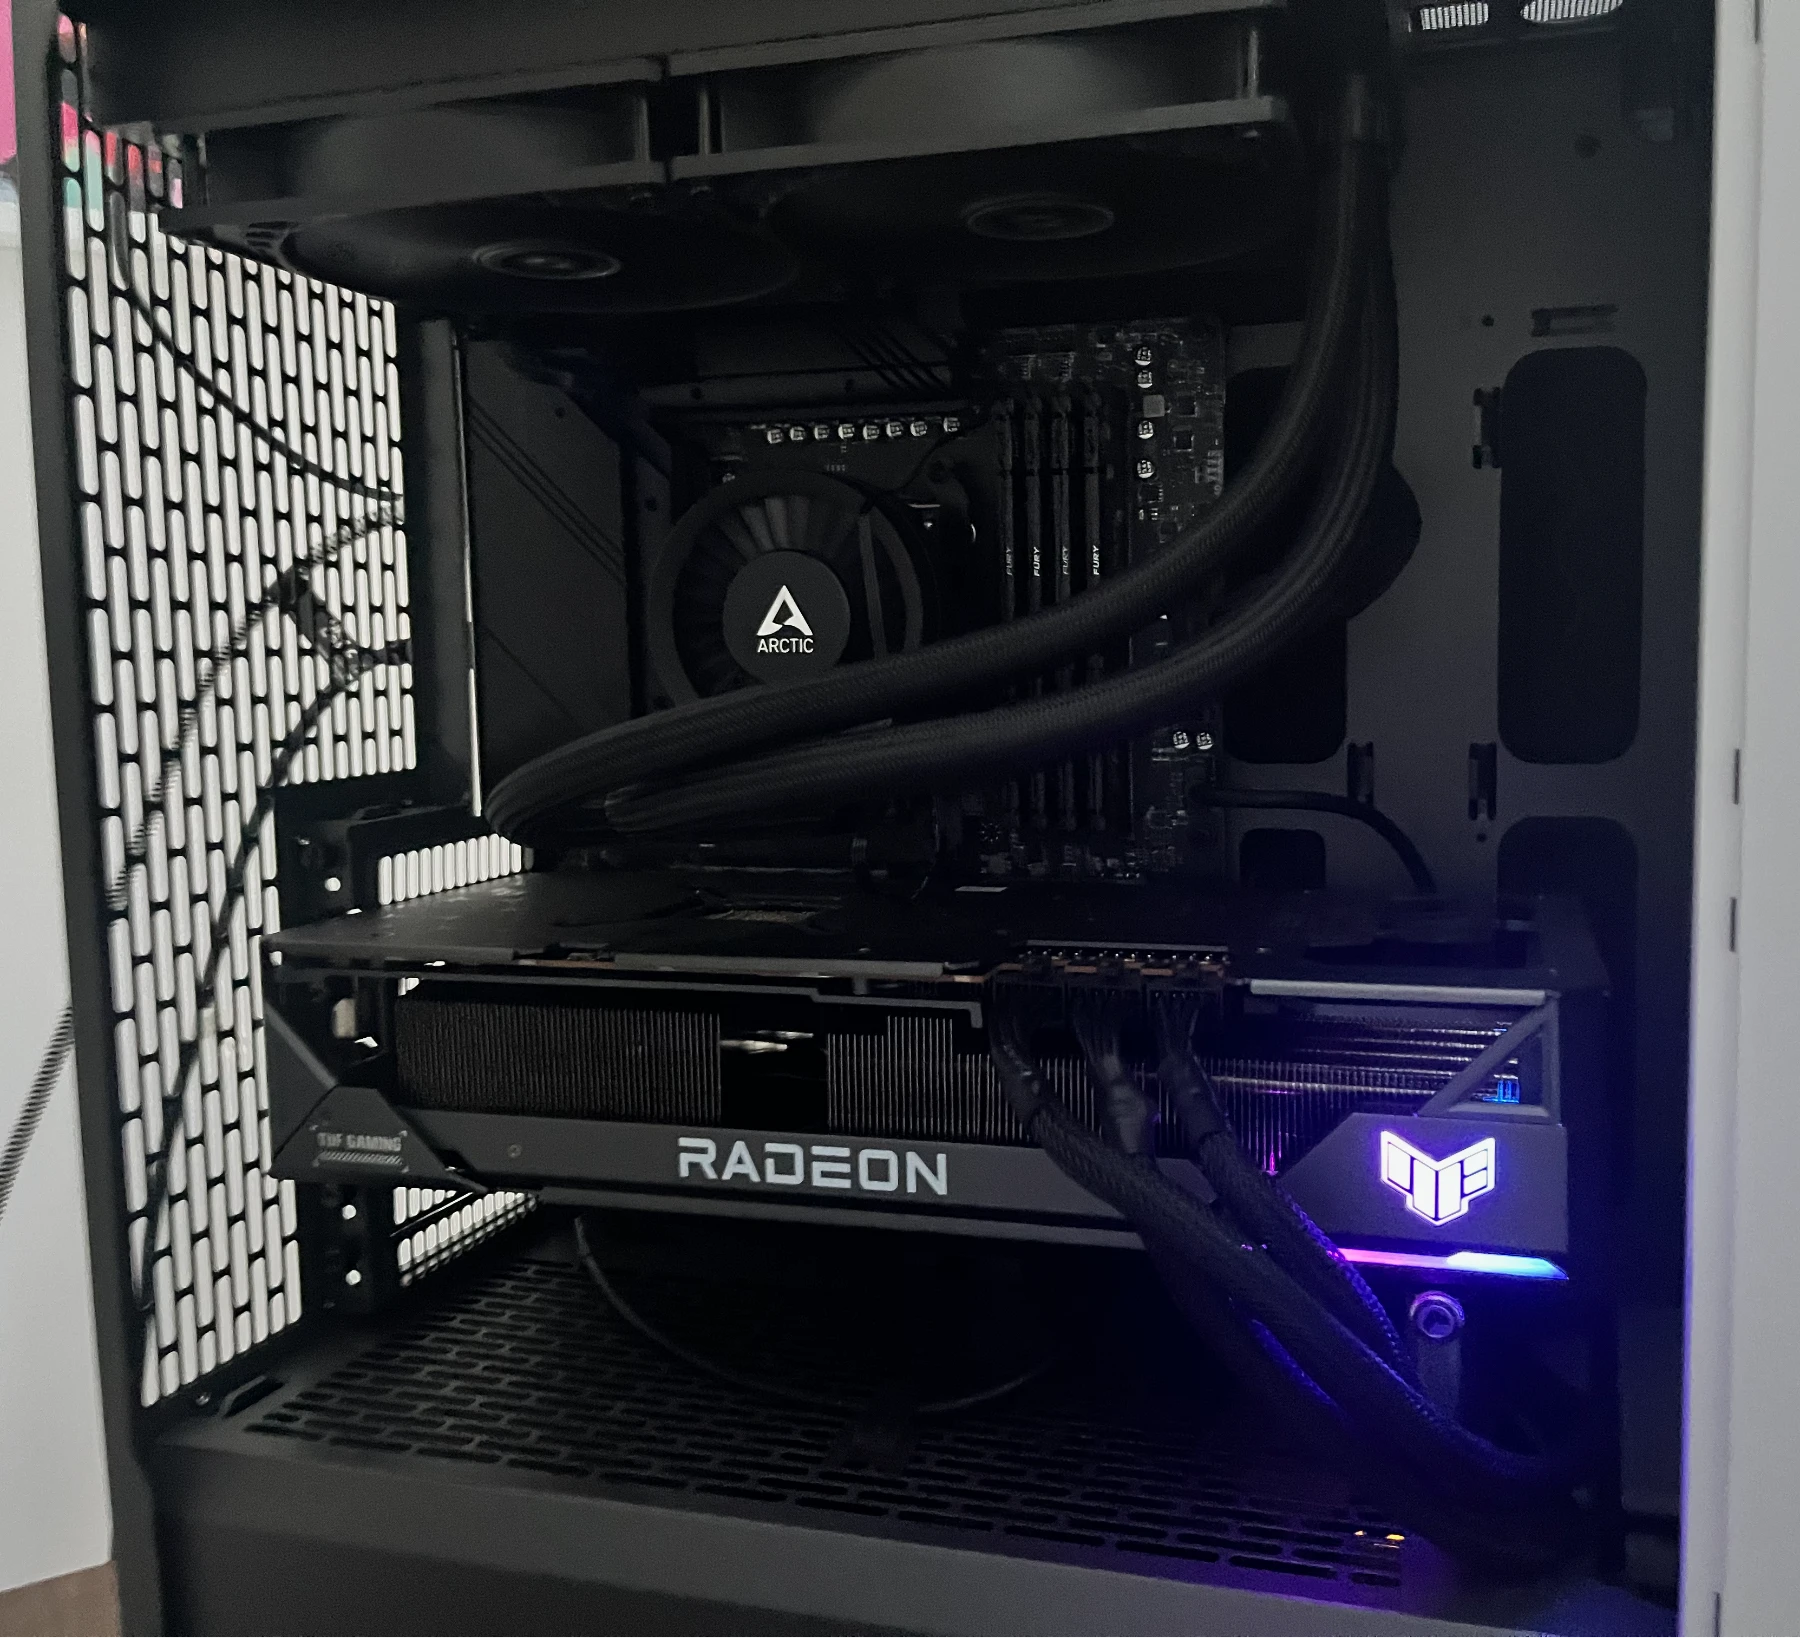
    My server is equipped with a total of 128GB of DDR5 RAM, made up of two Kingston FURY Beast kits (each consisting of 2 x 32GB, 6000 MHz, DDR5-RAM, DIMM).

    The RAM operates at around 3600 MHz and consistently maintains 32GB in active usage:

    Cooling

    I kept the fan coolers as they were and opted for an all-in-one liquid cooling solution: the Arctic Liquid Freezer III – 280. No particular reason, really—I just thought it was a cool choice (pun intended).

    PC Case

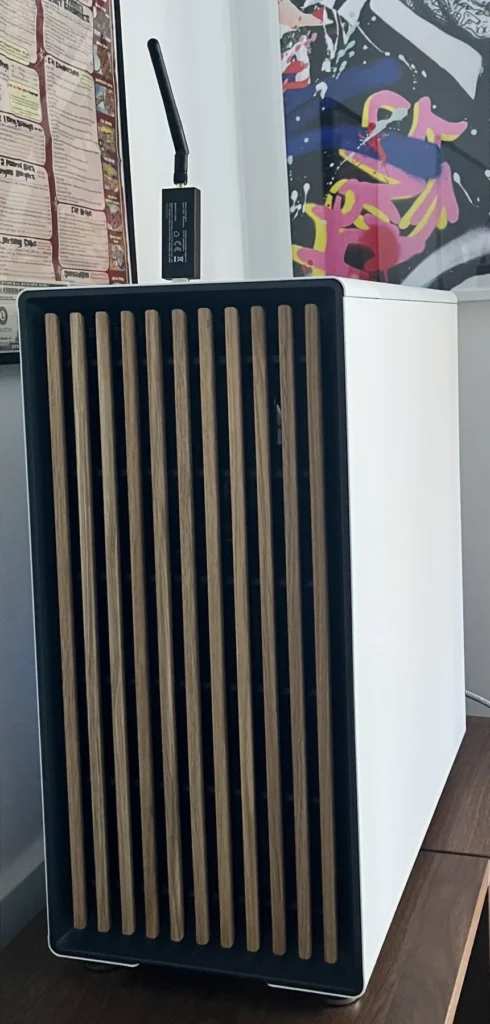
    This setup was originally intended to be a gaming-only PC, so I chose a sleek and clean-looking case: the Fractal Design North XL. While it’s an aesthetically pleasing choice, the one downside for use as a server is its limited storage capacity.

    CPU

    I chose the AMD Ryzen 7 7800X3D (AM5, 4.20 GHz, 8-Core), which is fantastic for gaming. However, as a server for my needs, I regret that it doesn’t have a better built-in GPU. Intel’s iGPUs are far superior for media transcoding, and using an integrated GPU instead of an external one would save a significant amount of energy.

    GPU

    I do have a dedicated GPU, the ASUS TUF Gaming AMD Radeon RX 7900 XTX OC Edition 24GB, which I chose primarily for its massive VRAM. This allows me to run larger models locally without any issues. However, when it comes to media transcoding, AMD GPUs fall short compared to other options, as highlighted in the Jellyfin – Selecting Appropriate Hardware guide.

    Mainboard

    I chose the MSI MAG B650 TOMAHAWK WIFI (AM5, AMD B650, ATX) as it seemed like a great match for the CPU. However, my GPU is quite large and ends up covering the only other PCI-E x16 slot. This limits my ability to install a decent hardware RAID card or other large expansion cards.

    Storage

    For the main OS, I selected the WD_BLACK SN770 NVMe SSD 2 TB, providing fast and reliable performance. To handle backups and media storage, I added a Seagate IronWolf 12 TB (3.5”, CMR) drive.

    For fast and redundant storage, I set up a ZFS mirror using two Intenso Internal 2.5” SSD SATA III Top, 1 TB drives. This setup ensures that critical data remains safe and accessible.

    Additionally, I included an external Samsung Portable SSD T7, 1 TB, USB 3.2 Gen.2 for extra media storage, rounding out the setup.

    Software

    For my main OS, I stick to what I know best—Proxmox. It’s absolutely perfect for home or small business servers, offering flexibility and reliability in a single package.

    I run a variety of services on it, and the list tends to evolve weekly. Here’s what I’m currently hosting:

    • Nginx Proxy Manager: For managing reverse proxies.
    • n8n: Automation tool for workflows.
    • Bearbot: A production-grade Django app.
    • Vaultwarden: A lightweight password manager alternative.
    • MySpeed: Network speed monitoring.
    • Another Nginx Proxy Manager: Dedicated to managing public-facing apps.
    • Code-Server: A browser-based IDE for developing smaller scripts.
    • Authentik: Single-Sign-On (SSO) solution for all local apps.
    • WordPress: This blog is hosted here.
    • Logs: A comprehensive logging stack including Grafana, Loki, Rsyslog, Promtail, and InfluxDB.
    • Home Assistant OS: Smart home management made easy.
    • Windows 11 Gaming VM: For gaming and other desktop needs.
    • Karlflix: A Jellyfin media server paired with additional tools to keep my media library organized.

    And this list is far from complete—there’s always something new to add or improve!

    Performance

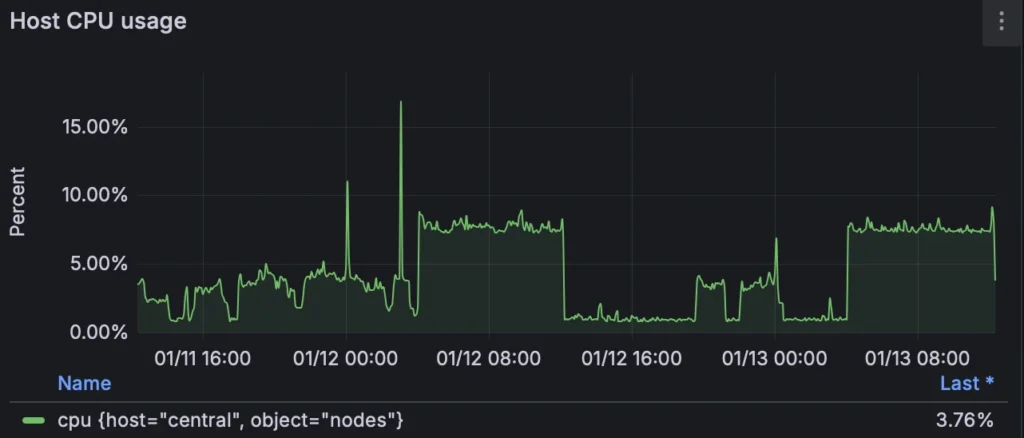
    The core allocation may be displayed incorrectly, but otherwise, this is how my setup looks:

    Here’s the 8-core CPU usage over the last 7 days. As you can see, there’s plenty of headroom, ensuring the system runs smoothly even with all the services I have running:

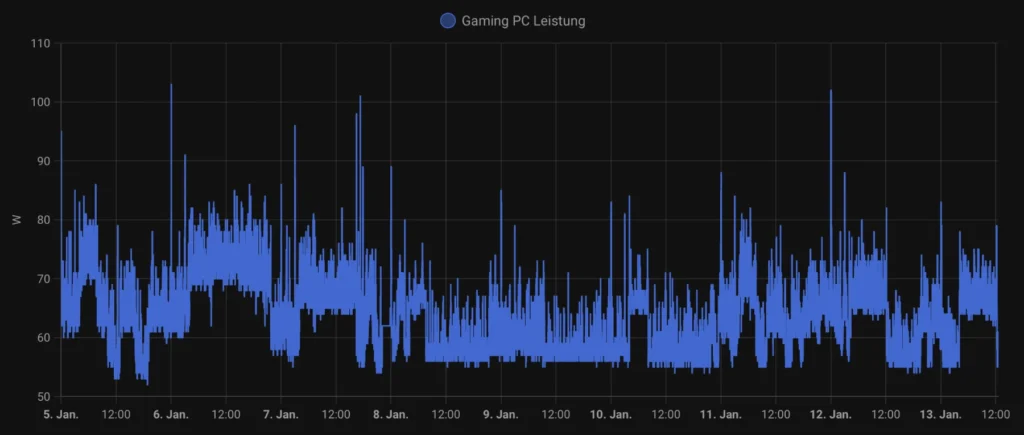
    Energy costs for my server typically range between 20-25€ per month, but during the summer months, I can run it at 100% capacity during the day using the solar energy generated by my panels. My battery also helps offset some of the power usage during this time.

    Here’s a solid representation of the server’s power consumption:

    I track everything in my home using Home Assistant, which allows me to precisely calculate the energy consumption of each device, including my server. This level of monitoring ensures I have a clear understanding of where my energy is going and helps me optimize usage effectively.

    Conclusion

    Hosting a server locally is a significant investment—both in terms of hardware and energy costs. My setup cost €2405, and I spend about €40 per month on energy, including domain and backup services. While my solar panels make running the server almost free during summer, winter energy costs can be a challenge.

    That said, hosting locally has its advantages. It provides complete control over my data, excellent performance, and the flexibility to upgrade or downgrade hardware as needed. These benefits outweigh the trade-offs for me, even though the energy consumption is higher compared to a Raspberry Pi or Mini-PC.

    I could have gone a different route. A cloud server, or even an alternative like the Apple Mac Mini M4, might have been more efficient in terms of cost and power usage. However, I value upgradability and privacy too much to make those sacrifices.

    This setup wasn’t meticulously planned as a server from the start—it evolved from a gaming PC that was sitting unused. Instead of building a dedicated server from scratch or relying on a Mini-PC and NAS combination, I decided to repurpose what I already had.

    Sure, there are drawbacks. The fans are loud, energy costs add up, and it’s far from the most efficient setup. But for me, the flexibility, control, and performance make it worthwhile. While hosting locally might not be the perfect solution for everyone, it’s the right choice for my needs—and I think that’s what really matters.

  • Securing Your Debian Server

    Securing Your Debian Server

    Hey there, server samurais and cyber sentinels! Ready to transform your Debian server into an impregnable fortress? Whether you’re a seasoned sysadmin or a newbie just dipping your toes into the world of server security, this guide is your one-stop shop for all things safety on the wild, wild web. Buckle up, because we’re about to embark on a journey full of scripts, tips, and jokes to keep things light and fun. There are many good guides on this online, I decided to add another one with the things I usually do. Let’s dive in!

    Initial Setup: The First Line of Defense

    Imagine setting up your server like moving into a new house. You wouldn’t leave the door wide open, right? The same logic applies here.

    Update Your System

    Outdated software is like a welcome mat for hackers. Run the following commands to get everything current:

    Bash
    sudo apt update && sudo apt upgrade -y

    Create a New User

    Root users are like the king of the castle. Let’s create a new user with sudo privileges:

    Bash
    sudo adduser yourusername
    sudo usermod -aG sudo yourusername

    Now, switch to your newly crowned user:

    Bash
    su - yourusername

    Securing SSH: Locking Down Your Castle Gates

    SSH (Secure Shell) is the key to your castle gates. Leaving it unprotected is like leaving the keys under the doormat.

    Disable Root Login

    Edit the SSH configuration file:

    Bash
    sudo nano /etc/ssh/sshd_config

    Change PermitRootLogin to no:

    Bash
    PermitRootLogin no

    Change the Default SSH Port

    Edit the SSH configuration file:

    Bash
    sudo nano /etc/ssh/sshd_config

    Change the port to a number between 1024 and 65535 (e.g., 2222):

    Bash
    Port 2222

    Restart the SSH service:

    Bash
    sudo systemctl restart ssh

    There is actually some controversy about security through obscurity, in my long tenure as an analyst and incident responser I believe less automated “easy” attacks do improve security.

    Set Up SSH Keys

    Generate a key pair using elliptic curve cryptography:

    Bash
    ssh-keygen -t ed25519 -C "[email protected]"

    Copy the public key to your server:

    Bash
    ssh-copy-id yourusername@yourserver -p 2222

    Disable password authentication:

    Bash
    sudo nano /etc/ssh/sshd_config

    Change PasswordAuthentication to no:

    Bash
    PasswordAuthentication no

    Restart SSH:

    Bash
    sudo systemctl restart ssh

    For more details, refer to the sshd_config man page.

    Firewall Configuration: Building the Great Wall

    A firewall is like the Great Wall of China for your server. Let’s set up UFW (Uncomplicated Firewall).

    Install UFW

    Install UFW if it’s not already installed:

    Bash
    sudo apt install ufw -y

    Allow SSH

    Allow SSH connections on your custom port:

    Bash
    sudo ufw allow 2222/tcp
    # add more services if you are hosting anything like HTTP/HTTPS

    Enable the Firewall

    Enable the firewall and check its status:

    Bash
    sudo ufw enable
    sudo ufw status

    For more information, check out the UFW man page.

    Intrusion Detection Systems: The Watchful Eye

    An Intrusion Detection System (IDS) is like a guard dog that barks when something suspicious happens.

    Install Fail2Ban

    Fail2Ban protects against brute force attacks. Install it with:

    Bash
    sudo apt install fail2ban -y

    Configure Fail2Ban

    Edit the configuration file:

    Bash
    sudo nano /etc/fail2ban/jail.local

    Add the following content:

    Bash
    [sshd]
    enabled = true
    port = 2222
    logpath = %(sshd_log)s
    maxretry = 3

    Restart Fail2Ban:

    Bash
    sudo systemctl restart fail2ban

    For more details, refer to the Fail2Ban man page.

    Regular Updates and Patching: Keeping the Armor Shiny

    A knight with rusty armor won’t last long in battle. Keep your server’s software up to date.

    Enable Unattended Upgrades

    Debian can automatically install security updates. Enable this feature:

    Bash
    sudo apt install unattended-upgrades -y
    sudo dpkg-reconfigure --priority=low unattended-upgrades

    Edit the configuration:

    Bash
    sudo nano /etc/apt/apt.conf.d/50unattended-upgrades

    Ensure the following line is uncommented:

    Bash
    "${distro_id}:${distro_codename}-security";

    For more details, refer to the unattended-upgrades man page.

    Again there is also some controversy about this. Most people are afraid that they wake up one night and all their servers are down, because a botched automated update. In my non-professional live with my home IT, this has never happened and even professionally, if we are just talking security updates of an OS like Debian, I haven’t seen it, yet.

    User Management: Only the Knights in the Realm

    Not everyone needs the keys to the kingdom. Ensure only trusted users have access. On a fresh install probably unnecessary, but good housekeeping.

    Review and Remove Unnecessary Users

    List all users:

    Bash
    cut -d: -f1 /etc/passwd

    Remove any unnecessary users:

    Bash
    sudo deluser username

    Implement Strong Password Policies

    Enforce strong passwords:

    Bash
    sudo apt install libpam-pwquality -y

    Edit the PAM configuration file:

    Bash
    sudo nano /etc/pam.d/common-password

    Add the following line:

    Bash
    password requisite pam_pwquality.so retry=3 minlen=12 difok=3

    For more details, refer to the pam_pwquality man page.

    File and Directory Permissions: Guarding the Treasure

    Permissions are like guards watching over the royal treasure. Make sure they’re doing their job.

    Secure /etc Directory

    Ensure the /etc directory is not writable by anyone except root:

    Bash
    sudo chmod -R go-w /etc

    This is heavily dependent on your distribution and may be a bad idea. I use it for locked down environments like Debian LXC that only do one thing.

    Set Permissions for User Home Directories

    Ensure user home directories are only accessible by their owners:

    Bash
    sudo chmod 700 /home/yourusername

    For more details, refer to the chmod man page.

    Automatic Backups: Preparing for the Worst

    Even the best fortress can be breached. Regular backups ensure you can recover from any disaster.

    Full disclosure: I have had a very bad data loss experience with rsync and have since switched to Borg. I can also recommend restic. This had nothing to do with rsync in itself, rather how easy it is to mess up.

    Install rsync

    rsync is a powerful tool for creating backups. Install it with:

    Bash
    sudo apt install rsync -y

    Create a Backup Script

    Create a script to backup your important files:

    Bash
    nano ~/backup.sh

    Add the following content:

    Bash
    #!/bin/bash
    rsync -a --delete /var/www/ /backup/var/www/
    rsync -a --delete /home/yourusername/ /backup/home/yourusername/

    Make the script executable:

    Bash
    chmod +x ~/backup.sh

    Schedule the Backup

    Use cron to schedule the backup to run daily:

    Bash
    crontab -e

    Add the following line:

    Bash
    0 2 * * * /home/yourusername/backup.sh

    For more details on cron, refer to the crontab man page.

    For longer backup jobs you should switch to a service with timer rather than cron. Here is a post from another blog about it. Since my data has grown to multiple terabyte this is what I do now too

    Advanced Security Best Practices

    Enable Two-Factor Authentication (2FA)

    Adding an extra layer of security with 2FA can significantly enhance your server’s protection. Use tools like Google Authenticator or Authy. I had this on an Ubuntu server for a while and thought it was kind of cool.

    1. Install the required packages:
    Bash
    sudo apt install libpam-google-authenticator -y
    1. Configure each user for 2FA:
    Bash
    google-authenticator
    1. Update the PAM configuration:
    Bash
    sudo nano /etc/pam.d/sshd

    Add the following line:

    Bash
    auth required pam_google_authenticator.so
    1. Update the SSH configuration to require 2FA:
    Bash
    sudo nano /etc/ssh/sshd_config

    Ensure the following lines are set:

    Bash
    ChallengeResponseAuthentication yes
    AuthenticationMethods publickey,keyboard-interactive

    Restart SSH:

    Bash
    sudo systemctl restart ssh

    Implement AppArmor

    AppArmor provides mandatory access control and can restrict programs to a limited set of resources.

    1. Install AppArmor:
    Bash
    sudo apt install apparmor apparmor-profiles apparmor-utils -y
    1. Enable and start AppArmor:
    Bash
    sudo systemctl enable apparmor
    sudo systemctl start apparmor

    For more details, refer to the AppArmor man page.

    Conclusion: The Crown Jewel of Security

    Congratulations, noble guardian! You’ve fortified your Debian server into a digital fortress. By following these steps, you’ve implemented strong security practices, ensuring your server is well-protected against common threats. Remember, security is an ongoing process, and staying vigilant is key to maintaining your kingdom’s safety.

    Happy guarding, and may your server reign long and prosper!