
Today, I want to walk you through how I handle backups for my home server. My primary method is using Proxmox’s built-in backup functionality, which I then sync to a Hetzner Storage Box for added security.
When it comes to updates, I like to live on the edge. I enable automatic (security) updates on nearly all of my systems at home using UnattendedUpgrades. For containers, I usually deploy a Watchtower instance to keep them updated automatically. While this approach might make some people nervous—fearing a broken system after an update—I don’t sweat it. I back up daily and don’t run any mission-critical systems at home (except for this blog, of course 😉).
For specific files or directories, like Vaultwarden, I take an extra layer of precaution by creating additional backups within the LXC container itself. These backups are synced to a Nextcloud instance I also manage through Hetzner, but in a different datacenter. Hetzner’s “Storage Shares” offer a great deal—€5 gets you 1TB of managed Nextcloud storage. While not the fastest, they’re reliable enough for my needs.
I won’t dive into the details here, but my approach for these backups is pretty straightforward: I use ZIP files and rclone to upload everything to Nextcloud.
Here is my script, maybe it helps you in some way:
#!/bin/bash

# Variables
BITWARDEN_DIR="/root/bitwarden"
BACKUP_DIR="/root/bitwarden-backup"
NEXTCLOUD_REMOTE="nextcloud:Vaultwarden"
TIMESTAMP=$(date '+%Y%m%d-%H%M')

# Ensure backup directory exists
mkdir -p $BACKUP_DIR

# Create a single tarball of the entire Vaultwarden directory
echo "Creating a full backup of the Vaultwarden directory..."
tar -czvf $BACKUP_DIR/vaultwarden_full_backup-${TIMESTAMP}.tar.gz -C $BITWARDEN_DIR .

# Sync the backup to Nextcloud
echo "Uploading backup to Nextcloud..."
rclone copy $BACKUP_DIR $NEXTCLOUD_REMOTE

# Clean up local backup directory
echo "Cleaning up local backups..."
rm -rf $BACKUP_DIR

echo "Backup completed successfully!"
Basically, all you need to do is create an App Password and follow the Rclone guide for setting up with WebDAV. It’s straightforward and works seamlessly for this kind of setup.
Backups in Proxmox
Proxmox makes backups incredibly simple with its intuitive functionality. I back up pretty much everything—except for my Gaming VM. It’s a Windows 11 experiment where I’ve passed through my AMD RX7900XT for gaming. Ironically, instead of gaming, I end up spending more time tweaking backups and writing about them. Let’s just say that gaming setup hasn’t exactly gone as planned.
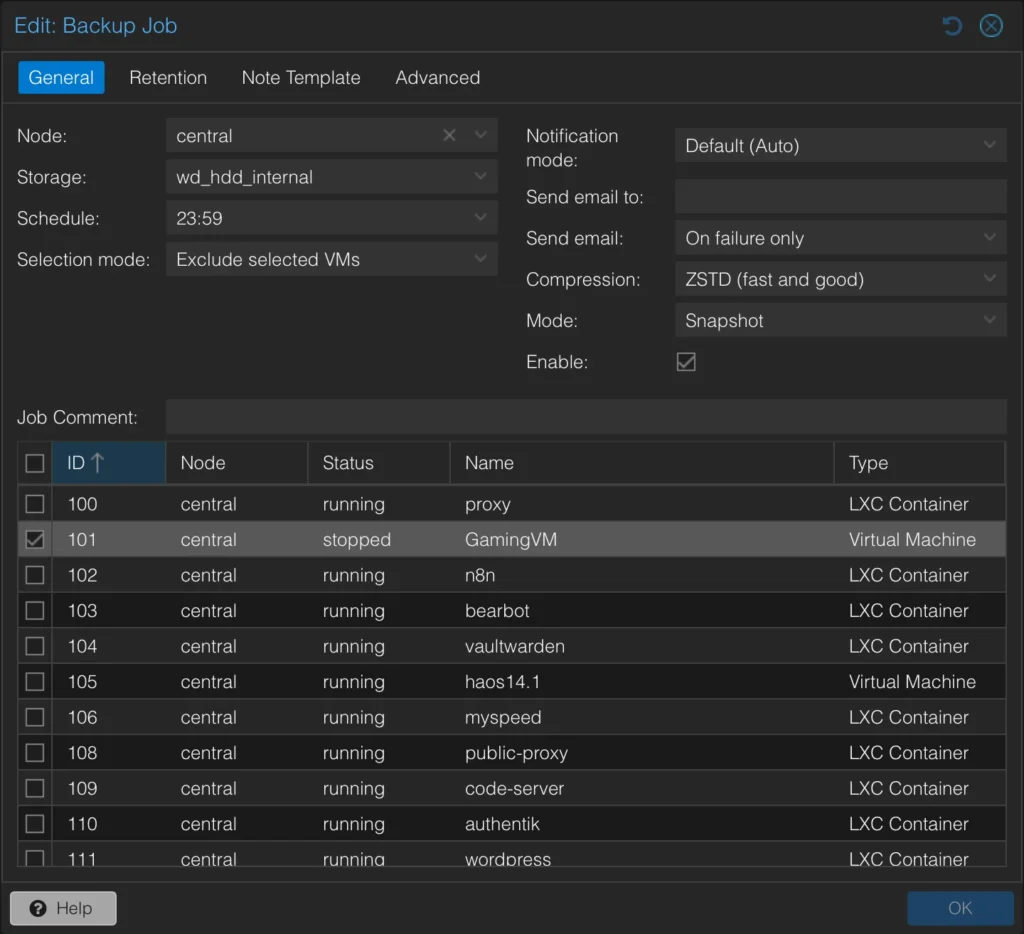
I rely on Snapshot mode for my backups, and you can explore all its features and settings right here. As I mentioned earlier, I tend to restore backups more frequently than most people, and I’ve never faced any issues with inconsistencies. It’s been consistently reliable for me!
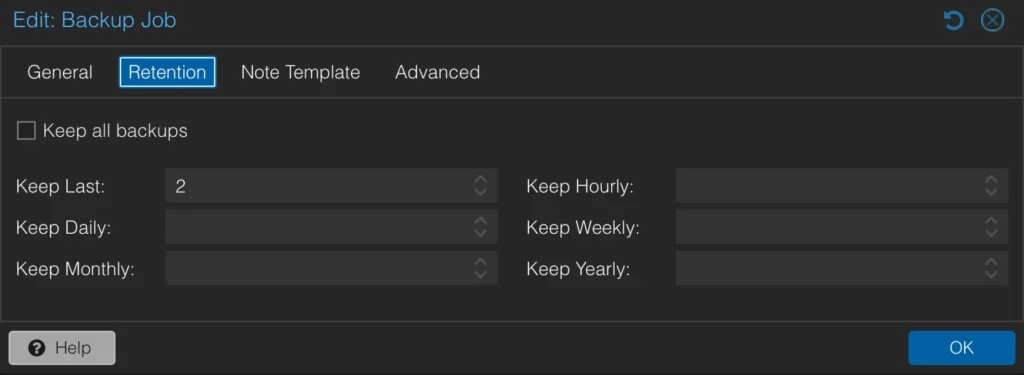
For retention, I keep it straightforward by saving only the last two backups. Since I also back up my backups (as you’ll see later), this minimalist approach is more than sufficient for my needs and saves me some space.
I left the rest of the settings as they are. The note templates are useful if you’re managing a large or multiple instances, but for my setup, I don’t use them.
Trigger warning: For now, I’m storing these backups on a single internal Seagate IronWolf (12 TB). I know, not ideal. These drives are pretty pricey, but one day I plan to add another and set up a ZFS mirror or RAID for better redundancy. For now, I’m relying on this one drive—fingers crossed, it’s been rock solid so far!
Borg(Backup)
The first thing I heard when I proudly told my friends that I was finally taking the golden 3-2-1 backup rule seriously was: “Why not restic?”
The simple answer? I Googled “backups to Hetzner Storage Box,” and the first result was an article explaining exactly what I wanted to do—using Borg 🤷♂️. Before I even considered trying restic, I had already set up encrypted incremental backups with Borg. Feel free to share what you use and why you might have switched, but for now, this setup works perfectly for me!
Hetzner Storage Box
Just to clarify, I’m not talking about Hetzner Storage Share 😁. I’m using their 5TB Storage Box and opted for Finland 🇫🇮 as the location since I already have other Karlcom-related stuff in their German datacenter. It helps keep things spread out a bit!
Essentially, it’s a big, affordable storage backend with multiple options for uploading data. You could mount it using the “Samba/CIFS” option, but I decided against that. Instead, I went with a more secure SSH connection to send my backups there.
Setup
First, you’ll need to upload your SSH key to the Hetzner Storage Box. You can follow this step by step guide.
Once that’s done, the next step is to install and Configure BorgBackup, which you can also follow the simple guide I linked to.
I know, it seems like you came here just to find links to set this up somewhere else. But don’t worry—I’ve got some cool stuff to share with you next. Here’s my backup script:
#!/bin/bash

# Variables
BORG_REPO="ssh://[email protected]:23/home/backups/central"

BORG_PASSPHRASE=''
BACKUP_SOURCE="/mnt/pve/wd_hdd_internal/dump"
LOG_FILE="/var/log/proxmox_borg_backup.log"
MAX_LOG_SIZE=10485760
RID=`uuidgen`
CHECK_ID="ggshfo8-9ca6-1234-1234-326571681"

# start
curl -fsS -m 10 --retry 5 "https://ping.yourdomain.de/ping/$CHECK_ID/start?rid=$RID"

# Export Borg passphrase
export BORG_PASSPHRASE

# Rotate log file if it exceeds MAX_LOG_SIZE
if [ -f "$LOG_FILE" ] && [ $(stat -c%s "$LOG_FILE") -gt $MAX_LOG_SIZE ]; then
    mv "$LOG_FILE" "${LOG_FILE}_$(date +"%Y-%m-%d_%H-%M-%S")"
    touch "$LOG_FILE"
fi

# Check for BorgBackup installation
if ! command -v borg &> /dev/null; then
    echo "ERROR: BorgBackup is not installed or not in PATH." >> "$LOG_FILE"
    exit 1
fi

# Check for SSH connection
if ! ssh -q -o BatchMode=yes -o ConnectTimeout=5 -p 23 -i ~/.ssh/backup u123456@ u123456.your-storagebox.de exit; then
    echo "ERROR: Unable to connect to Borg repository." >> "$LOG_FILE"
    exit 1
fi

# Logging start time
{
  echo "==== $(date +"%Y-%m-%d %H:%M:%S") Starting Proxmox Backup ===="

  # Check if the backup source exists
  if [ ! -d "$BACKUP_SOURCE" ]; then
      echo "ERROR: Backup source directory $BACKUP_SOURCE does not exist!"
      exit 1
  fi

  # Create a new Borg backup
  echo "Creating Borg backup..."
  borg create --stats --compression zstd \
      "$BORG_REPO::backup-{now:%Y-%m-%d}" \
      "$BACKUP_SOURCE" >> "$LOG_FILE" 2>&1


  if [ $? -ne 0 ]; then
      echo "ERROR: Borg backup failed!"
      exit 1
  fi

  # Prune old backups to save space
  echo "Pruning old backups..."
  borg prune --stats \
      --keep-daily=7 \
      --keep-weekly=4 \
      --keep-monthly=6 \
      "$BORG_REPO"

  if [ $? -ne 0 ]; then
      echo "ERROR: Borg prune failed!"
      exit 1
  fi

  echo "==== $(date +"%Y-%m-%d %H:%M:%S") Proxmox Backup Completed ===="
} >> "$LOG_FILE" 2>&1

# finished
curl -fsS -m 10 --retry 5 "https://ping.yourdomain.de/ping/$CHECK_ID?rid=$RID"
The curl requests at the top and bottom of the script are for my Healthchecks.io instance—I even wrote a blog post about it here.
Before moving on, you should definitely test this script. Depending on the size of your setup, the initial backup could take several hours. However, if it doesn’t fail within the first 10 seconds, that’s usually a good sign. To be sure it’s running smoothly, check the log file to confirm it started correctly:
==== 2025-01-10 01:39:07 Starting Proxmox Backup ====
Creating Borg backup...
------------------------------------------------------------------------------
Repository: ssh://u123456@ u123456.your-storagebox.de:23/home/backups/central
Archive name: backup-2025-01-10
Archive fingerprint: z724gf2789hgf972hf9uh...
Time (start): Fri, 2025-01-10 01:39:08
Time (end):   Fri, 2025-01-10 05:36:41
Duration: 3 hours 57 minutes 32.92 seconds
Number of files: 72
Utilization of max. archive size: 0%
------------------------------------------------------------------------------
                       Original size      Compressed size    Deduplicated size
This archive:               62.03 GB             61.98 GB             61.60 GB
All archives:               62.03 GB             61.98 GB             61.60 GB

                       Unique chunks         Total chunks
Chunk index:                   24030                40955
------------------------------------------------------------------------------
Pruning old backups...
------------------------------------------------------------------------------
                       Original size      Compressed size    Deduplicated size
Deleted data:                    0 B                  0 B                  0 B
All archives:               62.03 GB             61.98 GB             61.60 GB

                       Unique chunks         Total chunks
Chunk index:                   24030                40955
------------------------------------------------------------------------------
==== 2025-01-10 05:36:42 Proxmox Backup Completed ====
Security of BORG_PASSPHRASE
I decided to include the passphrase for encryption and decryption directly in the script because it fits within my threat model. My primary concern isn’t someone gaining access to my local Proxmox server and restoring or deleting my backups—my focus is on protecting against snooping by cloud providers or malicious admins.
Having the passphrase in the script works for me. Sure, there are other ways to handle this, but for the script to run automatically, you’ll always need to store the passphrase somewhere on your system. At the very least, it has to be accessible by root. This setup strikes the right balance for my needs.
Systemd timers
I created a system service to handle this backup process. For long-running jobs, it’s generally better to use systemd timers instead of cron, as they’re less prone to timeouts. I found this post particularly helpful when setting it up.
Here’s the service that actually runs my bash script:
[Unit]
Description=Proxmox BorgBackup Service
After=network.target

[Service]
Type=oneshot
ExecStart=/usr/local/bin/proxmox_borg_backup.sh
And here’s the systemd timer that handles scheduling the service:
[Unit]
Description=Run Proxmox BorgBackup Daily at 3 AM

[Timer]
OnCalendar=*-*-* 03:00:00
Persistent=true

[Install]
WantedBy=timers.target
Now, instead of enabling the service directly, you enable and start the timer. The timer will take care of starting the service according to the schedule you’ve defined. This setup ensures everything runs smoothly and on time!
systemctl enable proxmox_borg_backup.timer
systemctl start proxmox_borg_backup.timer
systemctl status proxmox_borg_backup.timer
That’s it! You’re all set. You can check the log file we created or use the journalctl command to review any errors or confirm successful runs. Happy backing up! 🎉
journalctl -xeu proxmox_borg_backup.timer

# or

tail -n 50 /var/log/proxmox_borg_backup.log
Conclusion
You should now have an easy and efficient solution to back up your Proxmox backups to a Hetzner Storage Box using Borg Backup. Both Borg and Restic support a variety of storage targets, so you can adapt this approach to suit your needs. In my setup, Borg performs incremental backups, uploading only new data, which helps keep storage costs low while maintaining security.
A word of caution: don’t lose your secrets—your encryption key or passphrase—because without them, you won’t be able to restore your data. Trust me, I’ve been there before! Thankfully, I had local backups to fall back on.
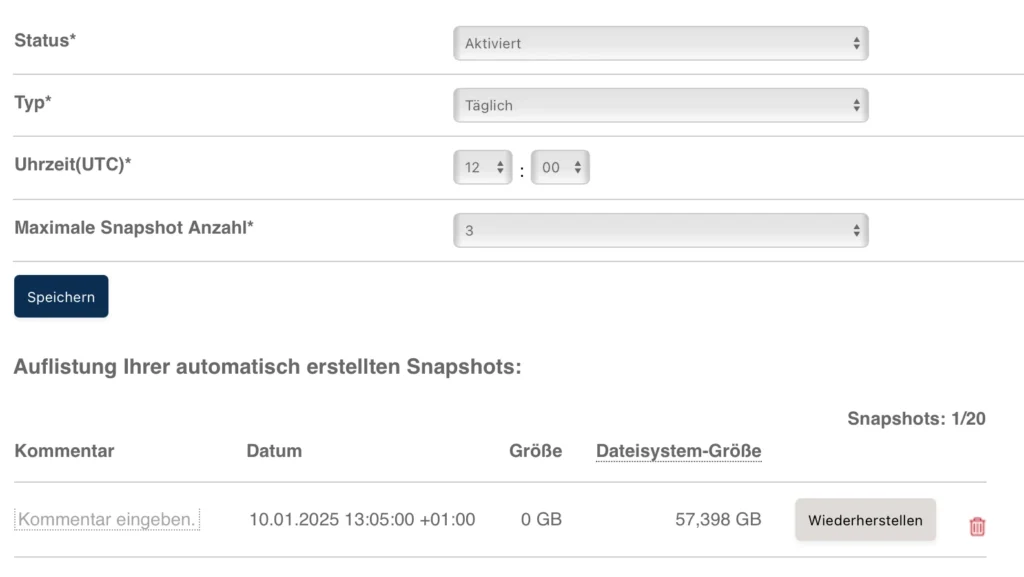
On Hetzner, I schedule daily backups at noon, after all my backup jobs have completed. I retain only the last three days, which works perfectly for me, though your needs might differ. Just remember that snapshot storage counts toward your total storage capacity—so if you have 1TB, the space used by snapshots will reduce the available storage for new data.
Thank you for reading! May your backups always be safe, your disks last long, and your systems run smoothly. Wishing you all the best—love you, byeeeeee! ❤️🚀

Leave a Reply