Today, I’m going to show you how you can obtain real, trusted SSL certificates for your home network or even a public website. Using this method, you can achieve secure HTTPS for your web services with certificates that browsers recognize as valid. Fun fact: the very website you’re reading this on uses this same method!
This guide focuses on using ACME-DNS with Nginx Proxy Manager (NPM), a popular reverse proxy solution with a user-friendly web interface. Whether you’re setting up a self-hosted website, Nextcloud, or any other service, this approach can provide you with certificates signed by a trusted Certificate Authority (CA) for your home network or the public.
Prerequisites
- I am assuming you are on a Debian based Linux distribution (I will use a Debian 12 LXC). This should work an any host supporting Docker though.
- You should have some knowledge of Docker and Docker Compose and it should be installed. You can find a step by step guide here.
- You need your own domain. I get mine from Namecheap but any provider works. (I usually change the Nameserver to Cloudflare and manage them there since Namecheap is cheaper to buy)
Please make sure you have these packages installed:
apt install curl jq nano(Jup, I like nano. Feel free to use your editor of choice.)
Installing Nginx Proxy Manager
Please refer to the installation guide on the Nginx Proxy Manager Website.
For our installation we will be using Docker with Docker Compose:
services:
  npm:
    image: 'jc21/nginx-proxy-manager:latest'
    restart: unless-stopped
    ports:
      - '443:443'
      - '81:81' # Admin Port
      # - '80:80' # not needed in this setup
    volumes:
      - ./data:/data
      - ./letsencrypt:/etc/letsencrypt
      # - ./custom-syslog.conf:/etc/nginx/conf.d/include/custom-syslog.conf
I only like to expose port 443, since we will be using ACME-DNS we will not need 80. Port 81 will be exposed for now, but once configured we will remove this too.
Now just run this command and you will be able to log in via http://your-ip:81 (replace “your-ip” with the actual IP of your machine, you can try http://127.0.0.1:81 if run locally)
docker compose up -dThe default credentials are:
Email:    [email protected]
Password: changeme
Optional:
I will show you my custom syslog config, but this is beyond the scope of this post, this is optional you do not need this:
log_format proxy_host_logs '$remote_addr - $remote_user [$time_local] '
                           '"$request" $status $body_bytes_sent '
                           '"$http_referer" "$http_user_agent" "$host" '
                           'tag="proxy-host-$host"';

access_log syslog:server=udp://logs.karl:514,tag=proxy-host-$host proxy_host_logs;
error_log syslog:server=udp://logs.karl:514,tag=proxy-host-$host warn;
logs.karl is my local DNS record for my rsyslog server. I will make a post about my logging setup and link it here in the future.
Setting up ACME-DNS
The official documentation can be found here.
Simply run this command:
curl -s -X POST https://auth.acme-dns.io/register | jqThe response should look like this (I used some “X” to anonymize it a little):
{
  "username": "XXXXc1ab-XXXX-XXXX-XXXX-ec893c5ad50e",
  "password": "CkdjW5wqnXXXXXXXXXXXXXXcGZZyznUDkGRuXHdz",
  "fulldomain": "XXXX040a-XXXX-XXXX-XXXX-XXXX f8525a11.auth.acme-dns.io",
  "subdomain": "XXXX040a-XXXX-XXXX-XXXX-XXXX f8525a11",
  "allowfrom": []
}
Please take note of your output and copy it to a file or note taking tool for later.
We will need to edit this a little. If you set this up for your home network it is usually a good idea to use subdomain and a wildcard certificate, this will enable you to secure anything under that subdomain.
There should be a “data” directory in your current one from the docker command earlier. We will create a JSON config file for Nginx Proxy Manager, you can name it whatever you want.
ls # check if "data" dir exists
cd data
nano acme__you_domain.json # use your domain name, but name does not matter
In this file you will need to paste the config. I suggest using a subdomain like “home”.
{
  "home.your-domain.com": {
    "username": "XXXXc1ab-XXXX-XXXX-XXXX-ec893c5ad50e",
    "password": "CkdjW5wqnXXXXXXXXXXXXXXcGZZyznUDkGRuXHdz",
    "fulldomain": "XXXX040a-XXXX-XXXX-XXXX-XXXX f8525a11.auth.acme-dns.io",
    "subdomain": "XXXX040a-XXXX-XXXX-XXXX-XXXX f8525a11",
    "allowfrom": []
  },
  "*.home.your-domain.com": {
    "username": "XXXXc1ab-XXXX-XXXX-XXXX-ec893c5ad50e",
    "password": "CkdjW5wqnXXXXXXXXXXXXXXcGZZyznUDkGRuXHdz",
    "fulldomain": "XXXX040a-XXXX-XXXX-XXXX-XXXX f8525a11.auth.acme-dns.io",
    "subdomain": "XXXX040a-XXXX-XXXX-XXXX-XXXX f8525a11",
    "allowfrom": []
  }
}
It is important to note that with a wildcard like this you can not do something like: “plex.media.home.your-domain.com”, you can only use the specified level of subdomain, if you did want to do a “sub-sub” you would need to use “*.media.home.your-domain.com” and so on.
A note on the “allowfrom": []“. If you have a static IP that you will always be coming from this is a good idea. Since this guide focuses on SSL for home you most likely have a dynamic IP which will work until it changes, so probably 24h or a week.
Configuring DNS Records
You need to edit your local DNS server and edit these in your registrar. I am using Cloudflare
Cloudflare
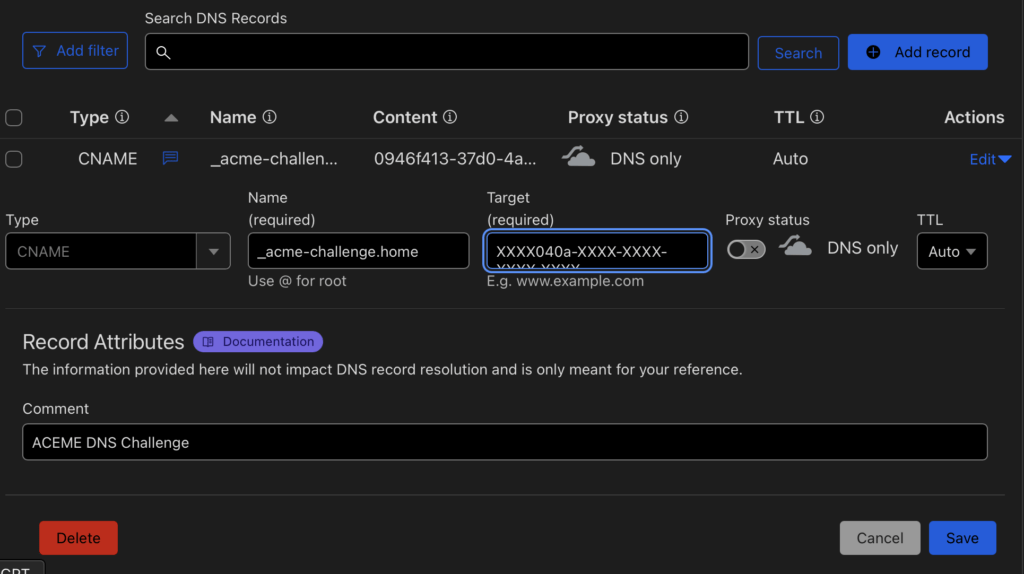
go to “your Domain -> DNS -> Records” there you will need to add a CNAME record.
In the “Name” field put “_acme-challenge.YOUR-SUBDOMAIN” in our example that would be like you see in the image below. In the “Target” field you put the “fulldomain” from your config, like “XXXX040a-XXXX-XXXX-XXXX-XXXX f8525a11.auth.acme-dns.io“. Leave “Proxy status” on “DNS only”.
(If you are doing a public and not home only setup you would also add a A, AAAA or CNAME record pointing to your public IP. For home setup you do not need this.)
Local DNS
The devices in your network need to know that your reverse proxy aka. Nginx Proxy Manager is handling “*.home.your-domain.com” you need to add this to your local DNS server so whenever someone goes to “*.home.your-domain.com” it is directed to your proxy. Now if you have a Pi-Hole, AdGuard, pfSense, OPNSense or in your Router varies, technically you could even edit the hosts file of each device.
I am using a Unifi Dream Machine :
In your dream machine go to: /network/default/settings/routing/dns
there you create a new entry like so:

Please use your configured domain and the IP of your system.
Bringing it all together
All we need to do now I configure our setup in the Nginx Proxy Manager. Go to your Admin interface at http://your-ip:81/nginx/certificates then click on “Add SSL-Certificate” and choose “Let’s Encrypt”
There is a lot going on here but I will explain:

- In “Domain Names” enter the domains you have configured
- Enter your E-Mail Address
- Choose “ACME-DNS” in the Provider menu
- In the API URL enter “https://auth.acme-dns.io”
- the registration file is the JSON file we created earlier. Add whatever you called it in there, the path “/data/” should be fine if you followed all the steps.
- Leave propagation empty
Finally just agree and save.

Your new certificate will pop up once the loading screen goes away.
It should look like this:

By the way, I have a profile image because I used my Gravatar email address for the admin login.
Securing the Nginx Proxy Manager Admin
Now that we have a certificate let us use it directly on our admin interface.
Add a new proxy host. Enter the domain of your choosing (you need to change “your-domain.com”. Since it is accessing itself in the Docker network the hostname is “npm” this is its name from the “docker-compose.yml” at the beginning.

Under the “SSL” tab just choose your created certificate.

You do not have to choose the options for Force SSL, HTTP/2 and Block Common Exploits for this to work.
Okay now press Save and test!
If it works you can now remove the port from the compose:
docker compose down
nano docker-compose.ymlservices:
npm:
image: 'jc21/nginx-proxy-manager:latest'
restart: unless-stopped
ports:
- '443:443'
volumes:
- ./data:/data
- ./letsencrypt:/etc/letsencryptdocker compose up -d --buildNow you can access your Nginx Proxy Manager admin interface via your new domain with a trusted SSL certificate.
Conclusion
Using ACME-DNS with Nginx Proxy Manager is a powerful way to obtain SSL certificates for your home network or website. It simplifies the process of handling DNS challenges and automates certificate issuance for secure HTTPS. You also will no longer have to expose your local services to the internet to get new certificates.
By following this guide, you’ve gained the tools to secure your online services with minimal hassle. Stay tuned for more tips on managing your self-hosted environment, and happy hosting!