In today’s digital age, the internet is saturated with advertisements and trackers, leading to slower browsing speeds and potential security threats. To combat these issues, leveraging AdGuard Home as a central ad blocker provides several key benefits, such as improved security and faster internet speeds. While browser plugins like “uBlock Origin” offer protection for individual devices within specific browsers, they fall short in safeguarding all devices, particularly those without browser support, such as IoT devices.
Enhanced Security
AdGuard Home blocks intrusive ads and potentially harmful websites before they even reach your devices. By filtering out malicious content, AdGuard Home significantly reduces the risk of malware infections and phishing attacks, safeguarding your personal information and sensitive data.
Protecting Privacy
Ads often come bundled with tracking scripts that monitor your online behavior, compromising your privacy. With AdGuard Home, you can prevent these trackers from collecting your data, preserving your anonymity and preventing targeted advertising based on your browsing habits.
Faster Internet Speeds
Advertisements consume valuable bandwidth and resources, leading to slower loading times and sluggish internet performance. By eliminating ads and unnecessary tracking requests, AdGuard Home helps optimize your network’s efficiency, resulting in faster page loading speeds and smoother browsing experiences.
Open-Source and Transparent
AdGuard Home is open-source software, meaning its source code is freely available for scrutiny and verification by the community. This transparency fosters trust and ensures that the software operates with integrity, free from hidden agendas or backdoors.
Hosting AdGuard Home
Now that you understand why you would want a central adblocker in your home network let’s get started in setting it up.
First you need to decide if you want to host locally or in the cloud.
Hosting locally:
Benefits:
easier setup
more secure
private
Drawbacks:
need a server
Cloud hosting:
Benefits:
no local server
better uptime
Drawbacks:
more setup for same privacy and security
Since DNS is not encrypted, like HTTPS for example, the cloud provider will most likely be able to see you DNS queries. You will need to use DNS-over-TLS or DNS-over-HTTPS. In a home network it is usually okay to use regular DNS, because AdGuard Home itself uses DNS-over-*S resolvers to get the final address. An example of Cloudflare’s resolvers
Depending on your setup, you might already have a server, Home Assistant, pfSesne firewall or nothing at all. I am going to assume you do not have any of the above. So first of all you will need to repuporse an old PC or somethign like a Raspberry Pi (which i highly recommend, i own 7).
I have personally run AdGuard Home in a reasoably sized home network on a Raspberry Pi Zero W. I recommend a bigger one, but if you’re on a really tight budget, that is probably your best bet.
Once you have a machine and it is running a Linux distribution of your choice, you now can install AdGuard Home either in a Container or directly.
That is it. You might have to copy the start command which will be shown in your terminal before you can set up your AdGuard in the browser.
Web UI
The steps for AdGuard in the Web UI are self explanatory so I did not go into detail here. You are basically good to go. I recommend 2 things:
Go to Filters > DNS blocklists, then click on “Add blocklist” and select every Security list. I have also enabled all the “General” blocklists and not trouble.
Go to Settings > DNS settings, I have the following upstream DNS server:
I think most of the readers will have a Fritz!Box so this is what I will show here. The setup is probably very similar on your router. You basically just have to edit the DNS server settings in your router.
Fritz!Box
I did not show you my DNS Server IP by mistake. Scroll to the end to find out why. 9.9.9.9 is the Quad9 DNS Server, I use this in case my AdGuard goes down, otherwise I would not be able to browse the web.
Bonus
You are welcome to use my public AdGuard Home instance at 130.61.74.147, just enter it into your router. Please be advised that i will be able to see you DNS logs, which means I would know what you do on the internet… I do not care to be honest so you are free to make your own choice here.
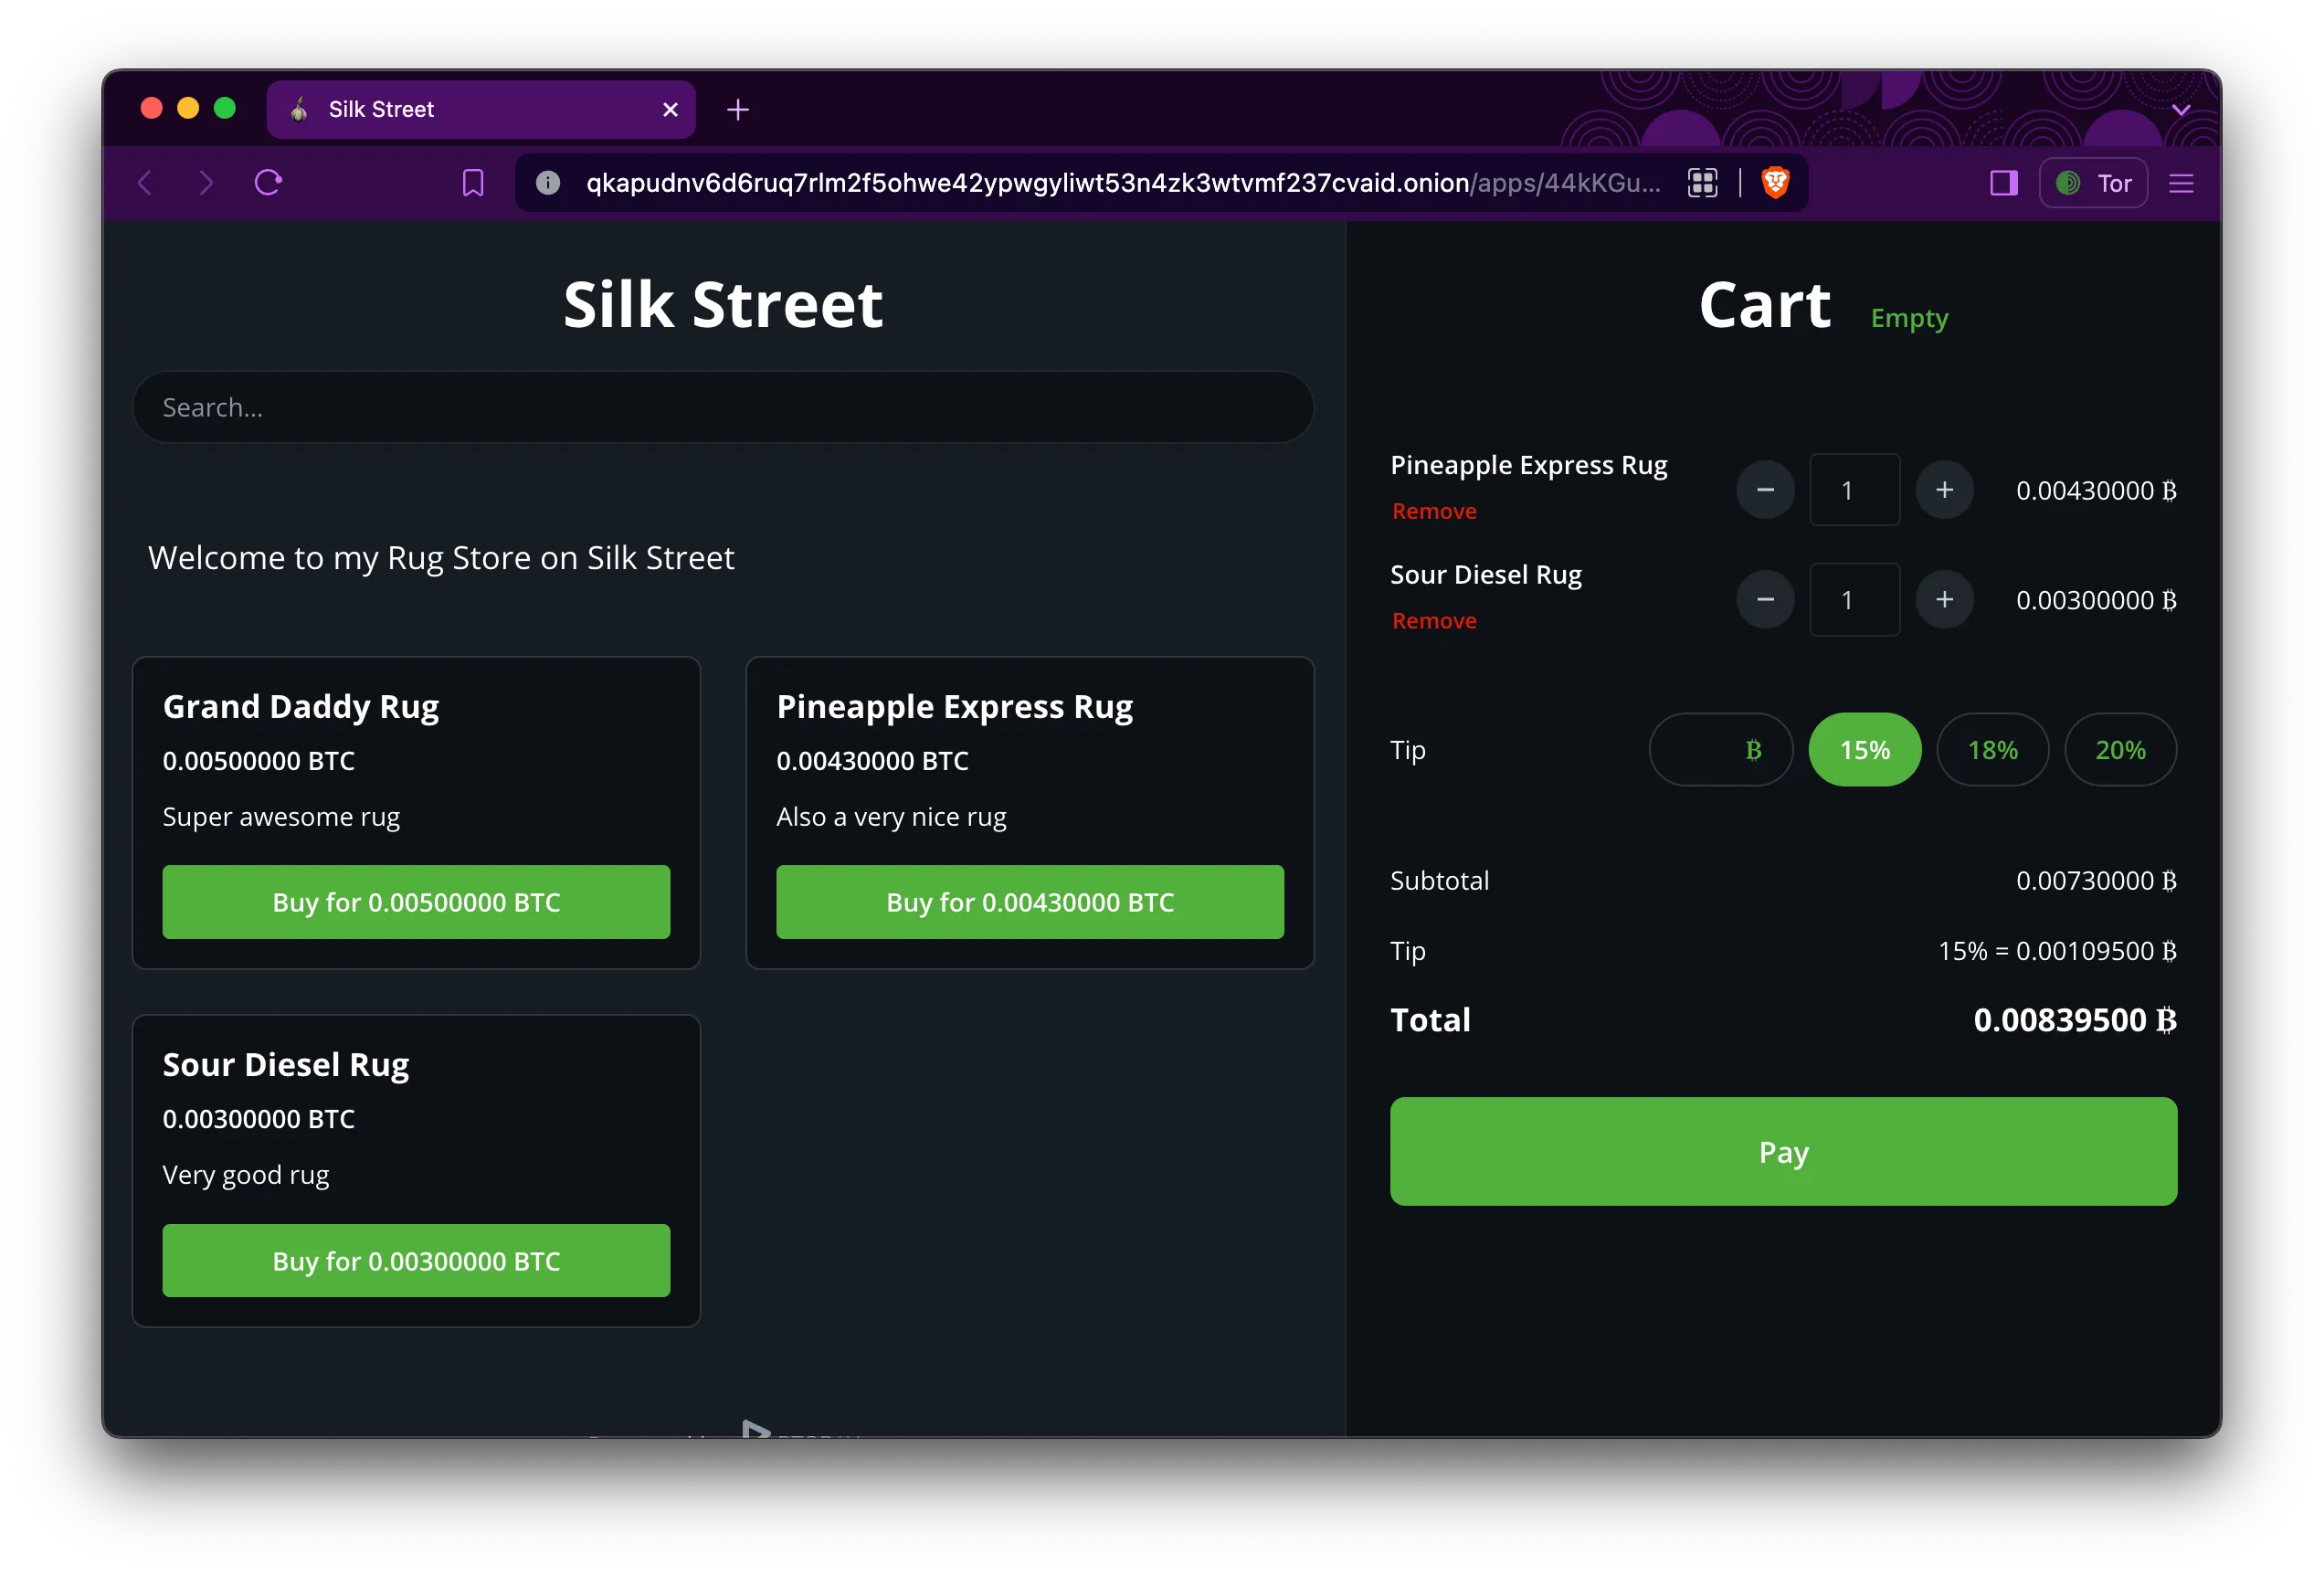
So, you’ve made the bold decision to take your rug-selling business to the mysterious realms of the internet’s underworld? Congratulations on joining the league of adventurers! But before you take the plunge into this clandestine universe, let’s shed some light on what exactly the dark web is.
Unveiling the Dark Web
Picture the dark web as the shady back alleys of cyberspace, lurking beyond the reach of traditional search engines like Google or Bing. To access this hidden realm, you’ll need specialized software such as Tor (The Onion Router). Tor works like a digital disguise, masking your online activities by bouncing them through a global network of servers, rendering them virtually untraceable. Think of it as donning a digital ski mask while you explore.
The Secrets Within
Within this shadowy domain lies a treasure trove of hidden services known as onion sites. These sites sport the “.onion” suffix and are exclusively accessible via Tor. They operate on encrypted networks, providing users with a veil of anonymity for their online dealings and conversations. Yes, your potential rug emporium can thrive in this covert corner of the internet.
Setting Up Shop
But don’t think setting up shop in the dark web is as simple as putting up a “For Sale” sign. It demands a certain level of technical expertise and a deep understanding of anonymity protocols. But fret not, brave entrepreneur, for we’re about to embark on a journey to illuminate the path to rug-selling triumph in the internet’s shadows. So, buckle up, adjust your night vision goggles, and let’s dive in.
Now that we’ve suited up with our cybernetic fedoras and armed ourselves with the necessary tools, it’s time to establish our base of operations. Think of it as laying the foundation for your virtual rug emporium.
Payment Processing: Decrypting the Coinage
In the dark web marketplace, cash is so last millennium. Cryptocurrencies reign supreme, offering a level of anonymity and decentralization that traditional fiat currencies can only dream of. To cater to our discerning clientele, we’ll be accepting payments in Bitcoin and Monero, the preferred currencies of choice for denizens of the deep web.
But how do we integrate these cryptocurrencies into our rug-selling empire? Fear not, for the internet offers solutions to meet our clandestine needs. Here are a few notable options to consider:
Bitcart: A sleek and user-friendly payment processor. With its robust features and seamless integration, Bitcart ensures a smooth transaction experience for both buyers and sellers. Check out their website for a complete list of features.
BTCPay Server: For the more tech-savvy rug merchants among us, BTCPay Server offers unparalleled flexibility and control over our payment infrastructure. This open-source platform allows us to self-host our payment gateway, giving us complete autonomy over our financial transactions. Check out their website for a complete list of features.
Now that we’ve selected our payment processors, it’s time to lay the groundwork for our virtual storefront. We’ll be starting with a fresh Debian 12 LXC container, providing us with a clean slate to build upon. Let’s roll up our sleeves and prepare our base system for the dark web bazaar:
With our base system primed and ready, we’re one step closer to realizing our rug-selling dreams in the shadowy corners of the internet. But remember, dear reader, the journey ahead is fraught with peril and intrigue. So, steel yourself, for the dark web awaits.
Bitcart
Effortless Deployment
Deploying Bitcart is a breeze with our simplified steps:
Using Bitcart to set up your online store is straightforward, but there’s a lot to learn to make the most of it. Check out their documentation to understand all the options and features.
Running an online store may seem easy, but it’s actually quite complex. Even though Bitcart makes it easier, there are still challenges, especially if you want to use it with Tor. Tor users might have trouble loading certain parts of your store, which could reveal their identity.
If you’re comfortable with WordPress, you might want to try Bitcart’s WooCommerce integration. But if you’re serious about building a dark web store, a custom solution is best. Bitcart offers a way to do this, which you can learn about here. You can use Python and Django to build it, which is great because Django lets you make pages with less JavaScript, which is important for user privacy.
So, while Bitcart is a good starting point, building your own store tailored for the dark web ensures you have more control and can give your users a safer experience. With the right tools and approach, you can create a successful online store in the hidden corners of the internet.
Harnessing Bitcart’s Capabilities
If you’re contemplating Bitcart, delving into their documentation could revolutionize your approach. Crafting a tailored solution using their API opens up a plethora of opportunities.
To bolster security, consider limiting Bitcart’s accessibility to your local machine, shielding it from prying eyes. Meanwhile, powering your marketplace storefront with platforms like PHP (Laravel), Django, or even Next.js provides scalability and flexibility.
This strategy seamlessly integrates Bitcart’s robust backend features with the versatility of these frameworks, ensuring a smooth and secure shopping experience for your users.
The reasoning behind this suggestion lies in the solid community support and reliability of battle-tested technologies. Platforms such as PHP (Laravel), Django, and Next.js boast extensive communities and proven track records—essential qualities in the dark web landscape.
In the clandestine corners of cyberspace, resilience reigns supreme. A single vulnerability in your storefront could lead to catastrophe. By aligning with established frameworks, you gain access to a wealth of expertise and resources, bolstering your defenses against potential threats.
Ultimately, adopting these trusted technologies isn’t merely a matter of preference—it’s a strategic necessity for safeguarding your online presence in the murky depths of the internet.
BTCPayServer: Unveiling a Sophisticated Setup
Setting up BTCPayServer demands a bit more effort due to its slightly complex documentation, especially when deploying on a local network. However, integrating Monero turned out to be surprisingly straightforward. Here’s an excellent guide on that: Accepting Monero via BTCPay Server.
I’ve made slight modifications to the deployment script from the official documentation:
Note that this is a local setup, but it will be publicly accessible over the onion address.
What distinguishes BTCPayServer is its sleek and modern admin interface. As someone who appreciates good design, I find its aesthetics truly appealing. Furthermore, it includes a built-in store and support for Tor, adding an extra layer of privacy.
Customization is seamless with BTCPayServer’s highly adaptable UI. Additionally, its robust API empowers users to craft their own frontend experiences, ensuring flexibility and control.
Their documentation provides clear and insightful examples, making development a delightful experience. Personally, as a fan of NodeJS, I found their NodeJS examples particularly helpful.
In this demonstration, I’ll initiate a Fast Sync to expedite the process. However, in practical scenarios, exercising patience becomes crucial. Given my location in a less technologically advanced country like Germany, Fast Sync typically completes within a few hours on my 100Mbit/s line, whereas the regular sync could span over several days.
Starting Fast Sync
Initiating Fast Sync is straightforward. Either follow the documentation or run these commands in your BTCPayServer directory:
(Please do not send any Bitcoin to this address. They will be lost.)
Clearing Things Up
Before we conclude, let’s debunk a common misconception about the “dark web.” It’s not merely a haven for illicit activities. While I used attention-grabbing examples to highlight these tools, it’s essential to recognize their legitimate applications.
Gone are the days when Tor provided complete anonymity for nefarious actors. As your enterprise expands, tracing your activities becomes increasingly feasible, albeit challenging.
I emphasize this point to underscore that the services and tools discussed here aren’t inherently unlawful. While they can be exploited for illicit purposes, they also serve valid functions.
Consider the case of “Shiny Flakes,” who operated a drug trade through a conventional website without relying on Tor, evading detection for a significant duration. You can explore this story further on Netflix: Shiny Flakes: The Teenage Drug Lord. The takeaway is that we shouldn’t demonize technology solely based on its potential for misuse. Encryption, for example, is integral for safeguarding data, despite its association with ransomware.
Understanding the dual nature of these technologies is crucial for fostering responsible usage and harnessing their benefits while mitigating risks. It’s a delicate balance between innovation and accountability in the ever-evolving landscape of cybersecurity.
Crafting Your Own Payment Processor
Creating a custom lightweight solution isn’t as daunting as it sounds. While the previously mentioned platforms offer comprehensive features, you might find yourself needing only a fraction of them. Allow me to introduce you to one of my “Karl Projects” that I never quite finished. One day, while procrastinating on my actual project, I stumbled upon the idea of a super-secret Telegram chat where people would have to pay fees in Bitcoin or Monero. This brainchild was inspired by contemplating the possibilities of utilizing a State Machine.
Here’s the gist of what you’ll need:
State Management: Maintain states such as ORDER_NEW, ORDER_PROCESSING, ORDER_PAID.
Dynamic Address Generation: Generate a new address for each transaction (because, let’s face it, that’s what the cool kids do).
Transaction Verification: Verify if transactions are confirmed.
Payment Request Generation: Create a mechanism for generating payment requests.
Now, let’s take a peek at my unfinished test code. May it ignite your creativity and spur you on to achieve remarkable feats:
Python
import jsonfrom typing import Listfrom bitcoinlib.wallets import Wallet, wallet_create_or_open, WalletKey, BKeyError# Creating or opening a walletw = wallet_create_or_open("karls_wallet",keys="",owner="",network=None,account_id=0,purpose=None,scheme="bip32",sort_keys=True,password="",witness_type=None,encoding=None,multisig=None,sigs_required=None,cosigner_id=None,key_path=None,db_uri=None,db_cache_uri=None,db_password=None,)defget_personal_address(wallet: Wallet, name: str="") -> WalletKey | List[WalletKey]:ifnot name:return wallet.keys()return wallet.key(name)defcreate_new_address(wallet: Wallet, name: str="") -> WalletKey:ifnot name:return wallet.get_key()return wallet.new_key(name)defcheck_for_transaction(wallet_key: str| WalletKey, wallet: Wallet):ifisinstance(wallet_key, str):try: wallet_key = wallet.key(wallet_key)except BKeyError as e:print(f'Sorry, no key by the name of "{wallet_key}" in the wallet.')return wallet.scan_key(wallet_key) recent_transaction = w.transaction_last(wallet_key.address)if recent_transaction:print("Most Recent Transaction:")print("Transaction ID:", recent_transaction.txid)print("Amount:", recent_transaction.balance_change)print("Confirmations:", recent_transaction.confirmations)else:print("No transactions found for the address.")
Feel free to adapt and expand upon this code to suit your needs. Crafting your payment processor from scratch gives you unparalleled control and customization options, empowering you to tailor it precisely to your requirements. Maybe one day I will put a finished minimalistic payment processor out there.
Summary
And with that disappointing note, we conclude for now. But fear not, for knowledge awaits. Here are some additional sources to delve deeper into the world of cybersecurity and anonymity:
Keep exploring, stay curious, and until next time!
In case you are from Interpol
You might be thinking, “Whoa, talking about setting up shop on the dark web sounds sketchy. Should we knock on this guys door?” Hey, I get it! But fear not, my friend. Writing about this stuff doesn’t mean I am up to no good. I am just exploring the possibilities, like any curious entrepreneur would. Plus, remember the “Shiny Flakes” story? Bad actors can do bad stuff anywhere, not just on the dark web.
An alternative server implementation of the Bitwarden Client API, written in Rust and compatible with official Bitwarden clients [disclaimer], perfect for self-hosted deployment where running the official resource-heavy service might not be ideal.
If you’re unfamiliar with Vaultwarden or Bitwarden, here’s a quick primer: Vaultwarden is a self-hosted password manager that allows you to securely access your credentials via web browsers, mobile apps, or desktop clients. Unlike traditional cloud-based solutions, Vaultwarden is designed for those of us who value control over our data and want a “syncable” password manager without the resource-heavy overhead.
Since anything that isn’t self-hosted or self-administered is out of the question for me, Vaultwarden naturally caught my attention. Its lightweight design is perfect for a minimal resource setup. Here’s what I allocated to my Vaultwarden instance:
• Alpine LXC
• 1 CPU Core
• 1 GB RAM
• 5 GB SSD Storage
And let me tell you, this thing is bored. The occasional uptick in memory usage you might notice is mostly me testing backups or opening 20 simultaneous sessions across devices—so not even Vaultwarden’s fault. To put it simply: you could probably run this on a smart toaster, and it would still perform flawlessly.
Why I Tried Vaultwarden
Initially, I came across Vaultwarden while exploring the Proxmox VE Helper Scripts website and thought, “Why not give it a shot?” The setup was quick, and I was immediately impressed by its sleek, modern UI. Since Vaultwarden is compatible with Bitwarden clients, you get the added bonus of using the polished Bitwarden desktop app and its functional, albeit less visually appealing, browser extension.
My main motivation for trying Vaultwarden was to move away from syncing my KeePass database across Nextcloud and iCloud. This process had become tedious, especially when setting up new development environments or trying out new Linux distributions—something I do frequently.
Each time, I had to manually copy over my KeePass database, which meant logging into Nextcloud to retrieve it—a task that was ironically dependent on a password stored inside KeePass, which I didn’t have access to yet. With Vaultwarden, I can simply open a browser, enter my master password, and access everything instantly.
Yes, it’s only one or two steps less than my KeePassXC workflow, but sometimes those minor annoyances add up more than they should. Vaultwarden’s seamless syncing across devices has been a breath of fresh air.
Is KeePassXC Bad? Not at All! Here’s Why I Still Love It
Over the years, KeePassXC has been an indispensable tool for managing my passwords and SSH keys. Even as new solutions like Vaultwarden (a self-hosted version of Bitwarden) gain popularity, KeePassXC continues to hold its ground, excelling in several areas where others fall short. Here’s a detailed breakdown of why I still rely on KeePassXC and how it outshines alternatives like Vaultwarden and Bitwarden.
Why KeePassXC Stands Out (in my opinion)
1. Superior Password Generator
KeePassXC’s default password generator is leaps and bounds ahead of the competition. Its design is both powerful and intuitive, offering extensive customization without overwhelming the user. You can effortlessly fine-tune the length, complexity, and character set of generated passwords, making it ideal for advanced use cases.
2. SSH Agent Integration
If you work with multiple SSH keys (I manage over 100), KeePassXC’s built-in SSH agent is a game-changer. It allows seamless integration and management of SSH keys alongside your passwords, streamlining workflows for developers and sysadmins alike. This feature alone makes KeePassXC a must-have for me.
3. File and Hidden Text Storage
Unlike Bitwarden, which doesn’t currently support file storage, KeePassXC offers advanced options for securely storing files and hidden text.
Why I’m Running KeePassXC and Vaultwarden in Parallel
While I’ve started using Vaultwarden for some tasks, there are still key features in KeePassXC that I simply can’t live without:
Local-Only Security:
KeePassXC keeps everything offline by default, which eliminates the risks of exposing passwords to the internet. Even though I host Vaultwarden behind a VPN for added peace of mind, there’s something inherently reassuring about KeePassXC’s local-first approach.
Privacy vs. Accessibility:
Vaultwarden offers enough security features like MFA, WebAuthn or hardwaretoken to safely expose it online, but the idea of having my passwords accessible over the internet still feels unsettling. For that reason, KeePassXC remains my go-to for my most sensitive credentials. I am probably just paranoid, hosting it behind Cloudflare and a firewall with a Client certificate would add sufficient security (on top) where you would not have to worry.
Unique Features:
There are small yet critical features in KeePassXC, like its file storage capabilities and SSH agent integration, that Vaultwarden simply lacks at the moment.
What Vaultwarden Does Well
To give credit where it’s due, Vaultwarden brings some compelling features to the table. One standout is the reporting feature, which alerts you to compromised passwords. It’s a fantastic tool for staying on top of security best practices, I am also a huge fan of web based tools and I like the UI and UX in general.
Conclusion
Both KeePassXC and Vaultwarden have their strengths, and which one you choose ultimately depends on your priorities. For me, KeePassXC remains the gold standard for password management, offering unparalleled functionality for advanced users. Vaultwarden complements it well for “cloud”-based access and reporting, but it still has a long way to go before it can replace KeePassXC in my workflow.
For now, running both in parallel strikes the perfect balance between security, usability, and convenience. Since I am running Vaultwarden on my Proxmox, which is already handling all my backup tasks, I also do not have to worry about data loss or doing extra work.
In the fast-paced world of software development, flexibility and efficiency are paramount. Enter code-server, an innovative tool that allows you to run Visual Studio Code (VS Code) in your browser, bringing a seamless and consistent development environment to any device, anywhere.
Whether you’re working on a powerful desktop, a modest laptop, or even a tablet (pls don’t!), code-server ensures you have access to your development environment at all times. Here’s an in-depth look at what makes code-server a game-changer.
What is code-server ?
code-server is an open-source project that enables you to run VS Code on a remote server and access it via your web browser. This means you can:
• Work on any device with an internet connection.
• Leverage the power of cloud servers to handle resource-intensive tasks.
• Maintain a consistent development environment across devices.
With over 69.2k stars on GitHub, code-server has gained significant traction among developers, teams, and organizations looking for efficient remote development solutions.
Why would you use code-server ?
1. Flexibility Across Devices
Imagine coding on your laptop, switching to a tablet, or even a Chromebook, without missing a beat. With code-server, your development environment follows you wherever you go—seamlessly.
2. Offloading Performance to the Server
Running resource-intensive tasks on a server instead of your local machine? Yes, please! Whether you’re working on complex builds or handling large datasets, code-server takes the heavy lifting off your device and onto the server.
3. Bringing Your Dev Environment Closer to LLMs
With the rise of large language models (LLMs), working near powerful servers hosting these models has become a necessity. No more downloading terabytes of data just to test integrations locally. Code-server simplifies this by placing your environment right where the action is.
4. Because I Can! 🥳
As a coder and IT enthusiast, sometimes the best reason is simply: Because I can! Sure, you could run local VSCode with “Remote Development” extensions or install it directly on a Chromebook—but where’s the fun in that? 😉
5. Streamlined Backup and File Management
One of my favorite aspects? Developing directly on a remote system where my regular backup processes already take care of everything. No extra steps, no worries—just peace of mind knowing my work is secure.
I just did it to do it, I use code-server to manage all my Proxmox scrips and develop little Sysadmin tools. You also get a nice web shell.
Installation
Requirements
Before diving in, make sure your system meets the minimum requirements:
• Linux machine with WebSockets enabled. (this is important to know when you use a reverse proxy)
• At least 1 GB RAM and 2 vCPUs.
I think you can get away with 1 CPU, mine is bored most of the time, obviously running resource intensive code will eat more.
There are multiple ways to get started with code-server, but I choose the easiest one:
Bash
curl-fsSLhttps://code-server.dev/install.sh|sh
This script ensures code-server is installed correctly and even provides instructions for starting it. Never run script like this from the internet before checking it.
Configuration
After installation, you can customize code-server for your needs. Explore the setup and configuration guide to tweak settings, enable authentication, and enhance your workflow.
Bash
nano~/.config/code-server/config.yaml
That is where you will find the password to access code-server and you can also change the port:
Today, I’m going to show you how you can obtain real, trusted SSL certificates for your home network or even a public website. Using this method, you can achieve secure HTTPS for your web services with certificates that browsers recognize as valid. Fun fact: the very website you’re reading this on uses this same method!
This guide focuses on using ACME-DNS with Nginx Proxy Manager (NPM), a popular reverse proxy solution with a user-friendly web interface. Whether you’re setting up a self-hosted website, Nextcloud, or any other service, this approach can provide you with certificates signed by a trusted Certificate Authority (CA) for your home network or the public.
Prerequisites
I am assuming you are on a Debian based Linux distribution (I will use a Debian 12 LXC). This should work an any host supporting Docker though.
You should have some knowledge of Docker and Docker Compose and it should be installed. You can find a step by step guide here.
You need your own domain. I get mine from Namecheap but any provider works. (I usually change the Nameserver to Cloudflare and manage them there since Namecheap is cheaper to buy)
Please make sure you have these packages installed:
Bash
aptinstallcurljqnano
(Jup, I like nano. Feel free to use your editor of choice.)
For our installation we will be using Docker with Docker Compose:
docker-compose.yml
services: npm: image: 'jc21/nginx-proxy-manager:latest' restart: unless-stopped ports: - '443:443' - '81:81' # Admin Port# - '80:80' # not needed in this setup volumes: - ./data:/data - ./letsencrypt:/etc/letsencrypt# - ./custom-syslog.conf:/etc/nginx/conf.d/include/custom-syslog.conf
I only like to expose port 443, since we will be using ACME-DNS we will not need 80. Port 81 will be exposed for now, but once configured we will remove this too.
Now just run this command and you will be able to log in via http://your-ip:81 (replace “your-ip” with the actual IP of your machine, you can try http://127.0.0.1:81 if run locally)
Please take note of your output and copy it to a file or note taking tool for later.
We will need to edit this a little. If you set this up for your home network it is usually a good idea to use subdomain and a wildcard certificate, this will enable you to secure anything under that subdomain.
There should be a “data” directory in your current one from the docker command earlier. We will create a JSON config file for Nginx Proxy Manager, you can name it whatever you want.
Bash
ls# check if "data" dir existscddatananoacme__you_domain.json# use your domain name, but name does not matter
In this file you will need to paste the config. I suggest using a subdomain like “home”.
It is important to note that with a wildcard like this you can not do something like: “plex.media.home.your-domain.com”, you can only use the specified level of subdomain, if you did want to do a “sub-sub” you would need to use “*.media.home.your-domain.com” and so on.
A note on the “allowfrom": []“. If you have a static IP that you will always be coming from this is a good idea. Since this guide focuses on SSL for home you most likely have a dynamic IP which will work until it changes, so probably 24h or a week.
Configuring DNS Records
You need to edit your local DNS server and edit these in your registrar. I am using Cloudflare
Cloudflare
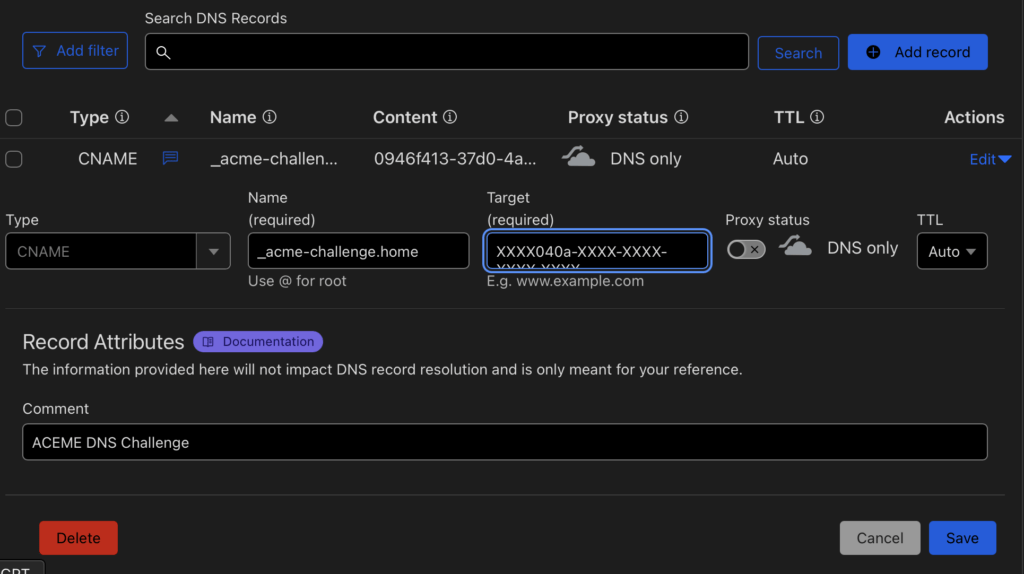
go to “your Domain -> DNS -> Records” there you will need to add a CNAME record.
In the “Name” field put “_acme-challenge.YOUR-SUBDOMAIN” in our example that would be like you see in the image below. In the “Target” field you put the “fulldomain” from your config, like “XXXX040a-XXXX-XXXX-XXXX-XXXX f8525a11.auth.acme-dns.io“. Leave “Proxy status” on “DNS only”.
(If you are doing a public and not home only setup you would also add a A, AAAA or CNAME record pointing to your public IP. For home setup you do not need this.)
Local DNS
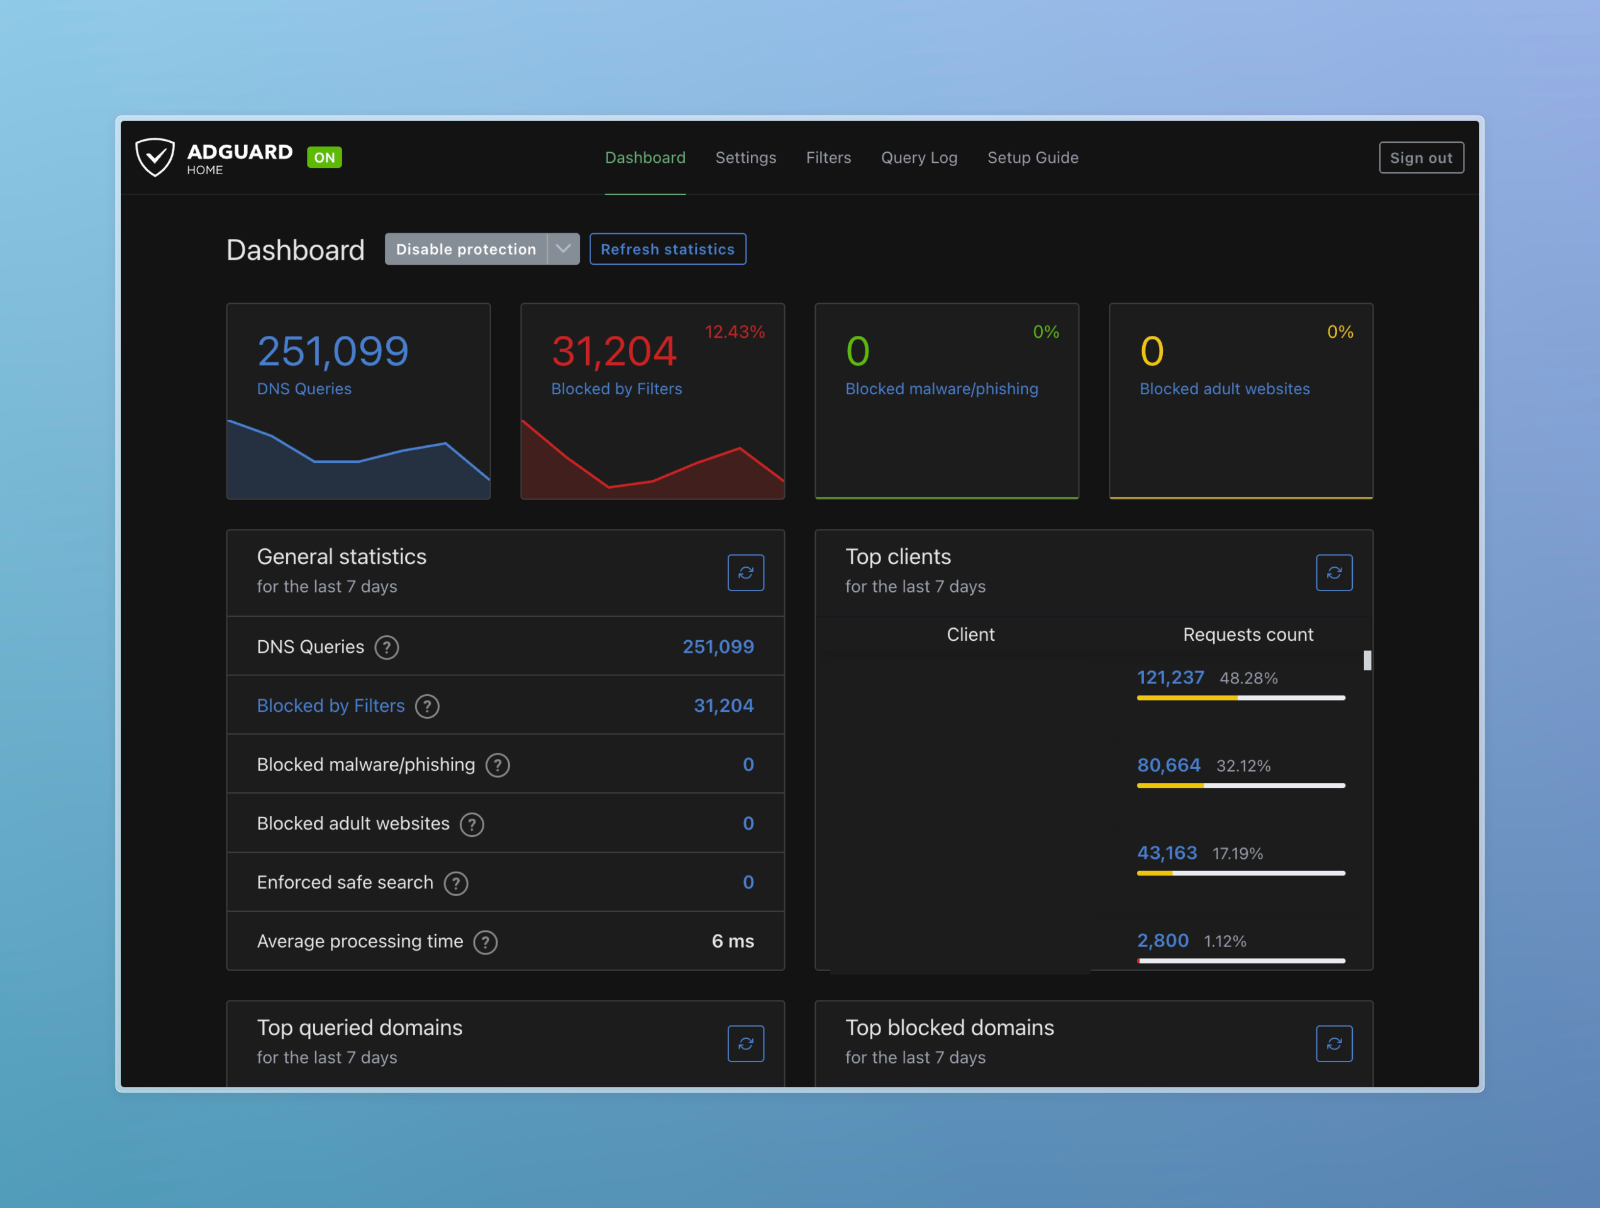
The devices in your network need to know that your reverse proxy aka. Nginx Proxy Manager is handling “*.home.your-domain.com” you need to add this to your local DNS server so whenever someone goes to “*.home.your-domain.com” it is directed to your proxy. Now if you have a Pi-Hole, AdGuard, pfSense, OPNSense or in your Router varies, technically you could even edit the hosts file of each device. I am using a Unifi Dream Machine :
In your dream machine go to: /network/default/settings/routing/dns
there you create a new entry like so:
Please use your configured domain and the IP of your system.
Bringing it all together
All we need to do now I configure our setup in the Nginx Proxy Manager. Go to your Admin interface at http://your-ip:81/nginx/certificates then click on “Add SSL-Certificate” and choose “Let’s Encrypt”
There is a lot going on here but I will explain:
In “Domain Names” enter the domains you have configured
Enter your E-Mail Address
Choose “ACME-DNS” in the Provider menu
In the API URL enter “https://auth.acme-dns.io”
the registration file is the JSON file we created earlier. Add whatever you called it in there, the path “/data/” should be fine if you followed all the steps.
Leave propagation empty
Finally just agree and save.
Your new certificate will pop up once the loading screen goes away.
It should look like this:
By the way, I have a profile image because I used my Gravatar email address for the admin login.
Securing the Nginx Proxy Manager Admin
Now that we have a certificate let us use it directly on our admin interface.
Add a new proxy host. Enter the domain of your choosing (you need to change “your-domain.com”. Since it is accessing itself in the Docker network the hostname is “npm” this is its name from the “docker-compose.yml” at the beginning.
Under the “SSL” tab just choose your created certificate.
You do not have to choose the options for Force SSL, HTTP/2 and Block Common Exploits for this to work.
Okay now press Save and test!
If it works you can now remove the port from the compose:
Now you can access your Nginx Proxy Manager admin interface via your new domain with a trusted SSL certificate.
Conclusion
Using ACME-DNS with Nginx Proxy Manager is a powerful way to obtain SSL certificates for your home network or website. It simplifies the process of handling DNS challenges and automates certificate issuance for secure HTTPS. You also will no longer have to expose your local services to the internet to get new certificates.
By following this guide, you’ve gained the tools to secure your online services with minimal hassle. Stay tuned for more tips on managing your self-hosted environment, and happy hosting!
Manage Consent
To provide the best experiences, we use technologies like cookies to store and/or access device information. Consenting to these technologies will allow us to process data such as browsing behavior or unique IDs on this site. Not consenting or withdrawing consent, may adversely affect certain features and functions.
Functional
Always active
The technical storage or access is strictly necessary for the legitimate purpose of enabling the use of a specific service explicitly requested by the subscriber or user, or for the sole purpose of carrying out the transmission of a communication over an electronic communications network.
Preferences
The technical storage or access is necessary for the legitimate purpose of storing preferences that are not requested by the subscriber or user.
Statistics
The technical storage or access that is used exclusively for statistical purposes.The technical storage or access that is used exclusively for anonymous statistical purposes. Without a subpoena, voluntary compliance on the part of your Internet Service Provider, or additional records from a third party, information stored or retrieved for this purpose alone cannot usually be used to identify you.
Marketing
The technical storage or access is required to create user profiles to send advertising, or to track the user on a website or across several websites for similar marketing purposes.
 I did not show you my DNS Server IP by mistake. Scroll to the end to find out why.