
If you’ve ever exposed a server to the open internet, you know the truth: the web is a noisy, hostile place. Within roughly three seconds of opening port 22 or spinning up a web server, a botnet halfway across the globe will start politely inquiring if your wp-admin directory is unlocked or if you’re still running a vulnerable version of Log4j. It is the background radiation of the internet.
To fight this, I wanted to answer one simple, crucial question: “Is this IP or domain malicious?”
Censys or Shodan were not always helpful, they did not show me data for a lot of the IP’s that were “attacking” me.
Normally, to get programmatically fast, highly-available answers to this question, you have to hand over a hefty monthly retainer to an enterprise threat intelligence vendor for an API key, that pretty much just collects open source information to sell to you.
I decided I didn’t want to do that. Instead, I built isbadip.com.

It’s a fully homegrown, high-performance API that aggregates dozens of threat feeds, deduplicates them, and answers queries in less than a millisecond. It uses zero paid APIs. All lookup logic runs entirely in-process, entirely in memory. And the backend? It’s not Go. It’s not Rust. It’s a single instance of Node-RED running in a Proxmox LXC container.

Yes, the drag-and-drop tool usually used to turn on Philips Hue bulbs when your garage door opens is currently acting as a hyper-optimized threat detection engine.
Here is the technical deep dive into exactly how it works, why it’s blazingly fast, and how I built an automated vengeance loop for my home network.

The “Over-Engineered Homelab” Architecture
The infrastructure behind isbadip.com relies on keeping things stupidly simple at the edge and highly optimized in the core. There are no sprawling microservices or Kubernetes clusters weeping under the weight of idle databases.
Here is the traffic flow:

- Cloudflare DNS + WAF: The user navigates to
isbadip.com. The initial request hits Cloudflare’s edge network, passing through the DNS resolution and Web Application Firewall. - Cloudflare Pages CDN: Cloudflare serves the React Single Page Application (SPA) directly to the user’s browser from its global CDN.
- API Request Initiation: The user interacts with the loaded SPA, which triggers an asynchronous API call to
api.isbadip.com. - Fritz!Box Router Firewall: The API request travels to my home network’s public IP and hits the edge gateway, the Fritz!Box Router Firewall.
- Ubiquiti Dream Machine: The Fritz!Box passes the traffic downstream to my Ubiquiti Dream Machine, which processes the request through its internal firewall rules and Intrusion Prevention System (IPS).
- Nginx Reverse Proxy : The UDM routes the allowed traffic into my Proxmox cluster, specifically handing it off to the Nginx reverse proxy running inside. (I am not using Proxmox firewall)
- Node-RED Backend: Nginx terminates the connection and proxies the request to the application backend, the Node-RED container running via Docker inside an Alpine LXC. Only /api/v1/* is allowed here.
- Data Query: Node-RED processes the request against its in-memory lookup maps, which were built using the threat intelligence feeds stored on the
/data/blocklists/persistent volume. - Everything is returned to the Website, which then shows you the result.
The Engine Room:
We are running Alpine with 2 vCPUs and a generous 2 GB of RAM. Node-RED runs as a Docker container. There is no separate backend service, no Redis cache, and no PostgreSQL database. All processing, aggregation, and API lookup logic lives inside Node-RED function nodes using vanilla JavaScript.
Phase 1: The Nightly Data Heist
Every night at roughly 02:00 UTC, a cron-triggered inject node wakes up and goes grocery shopping for bad actors.

It consults our sources.json “database”, the single source of truth, and fires off parallel HTTP requests to ~20 public IP threat feeds (IPSum, Spamhaus, Blocklist.de) and 7 domain feeds (Phishing Army, ThreatFox, etc.).
The Wild West of Feed Formats
Public threat feeds are beautiful, but they do not agree on formatting. Some are plain text (plain), some use /etc/hosts formats (hosts), some are CSVs (csv_domain), and some use complex multi-field formats with CIDR ranges (dshield).
I built custom parsers for all 6 format types. But once the data is parsed, we run into a bigger problem: Noise.
Deduplication and The “Confidence” Signal
If an IP is flagged by a single obscure list, it might be bad, but it might also be a false positive. But if 198.51.100.4 shows up in a Spam feed, a Tor Exit Node list, and a Botnet C2 tracker… you can bet your life it’s malicious.
All parsed results flow into a single aggregation function. For exact IPs, a plain JS object is used as a hash map. If an IP appears in multiple sources:
- All source names are pushed to a
sources[]array. - All categories are pushed to a
categories[]array. - The highest threat score is preserved using
Math.max.
This cross-source count becomes our confidence score.
Listed by
- 3+ independent feeds? High confidence
- 2 feeds? Medium
- 1 feed? Low.
For CIDR ranges (entire subnets of bad IPs), we sort them by start address and mathematically sweep through, extending the end of the last range when the next range overlaps. Merging these overlapping subnets is critical to save CPU cycles later.
Phase 2: Building the Hyper-Optimized Data Structures
You cannot simply grep through 15 megabytes of text every time a web request comes in. You need speed.

Once the nightly deduplication finishes, Node-RED builds three specific data structures directly into the V8 engine’s memory heap.
1. The Exact IP Map (O(1) Speed)
const ipMap = new Map(Object.entries(finalObj));
global.set('ip_map', ipMap);
We take our deduplicated IPs and load them into an ES6 Map. We have about ~137,000 entries. In V8, a Map provides highly optimized O(1) hash table lookups.
Pro-tip: When persisting this to disk, I save it as an array of arrays (
[[ip, data], ...]).Calling
JSON.parse()on this format and feeding it directly tonew Map()is roughly 30% faster than parsing a massive standard JSON object, because V8 doesn’t have to re-box the object’s prototype chain for 137,000 keys.
2. The Bloom Filter (The Bouncer)
Most IPs queried against the API are clean. We don’t want to waste time checking the Map if we don’t have to. Enter the Bloom Filter.
A Bloom filter is a probabilistic data structure. It uses a tiny amount of memory (about 335 KB for ~2.7 million bits) to answer a crucial question: “Is this IP definitely clean, or maybe malicious?” It has zero false negatives.
We hash incoming IPs using three independent FNV-1a hash functions:
function bHash(key, seed) {
  let h = seed;
  for (let i = 0; i < key.length; i++) {
    h ^= key.charCodeAt(i);
    h = Math.imul(h, 0x01000193) >>> 0;  // FNV prime multiply
  }
  return h % bloomBits;
}
When building the filter, every malicious IP flips 3 specific bits to 1. During an API lookup, we check those 3 bits.
- If any of them are
0, the IP is definitely clean. The Node-RED function returns immediately in< 0.1mswithout ever touching the Map. - If all 3 are
1, it might be malicious (or it’s a 1-3% false positive collision), and then we check the Map.
The Caveman Explanation: The Footprint Rule
You are a caveman guarding the cave door.
You have a Big Heavy Rock with drawings of every Bad Animal in the world. But the rock is very heavy and takes a long time to read. If you read the rock every time an animal walks by, you will get eaten.
So, you make a fast rule: The Footprint Rule (The Bloom Filter).
You notice all Bad Animals have exactly 3 sharp toes.
When an animal walks up to the cave, you look at its footprint in the mud before you look at the Big Heavy Rock:
- Missing a toe? (0, 1, or 2 toes) -> DEFINITELY GOOD. You let it in instantly. You don’t even look at the Big Heavy Rock.
- Has 3 sharp toes? -> MAYBE BAD. It could be a Bad Animal, or it could just be a weird good animal. Now you take the time to read the Big Heavy Rock to be 100% sure.
Most animals walking by are good animals missing a toe. You save a lot of time by never looking at the Big Heavy Rock for them!
3. The Sorted CIDR Array (Binary Search)
IPv4 addresses are just 32-bit integers wearing a trench coat. The CIDR 192.168.0.0/16 actually represents the integers 3232235520 to 3232301055.
By converting all 3,992 blocked CIDR ranges to integers and sorting them, we unlock the power of O(log n) binary search:
let lo = 0, hi = cidrs.length - 1;
while (lo <= hi) {
  const m = (lo + hi) >> 1;
  if (n >= cidrs[m][0] && n <= cidrs[m][1]) return match;  // hit!
  n < cidrs[m][0] ? hi = m-1 : lo = m+1;
}
With ~4,000 subnets, it takes at most 12 comparisons (log2(3992) ≈ 12) to figure out if an IP is hiding in a bad neighborhood.
Phase 3: The Reversed-Label Trie (Solving Wildcards)
Domains present a unique challenge. If evil.com is hosting malware, api.evil.com and dev.sub.evil.com are almost certainly malicious too. You need wildcard matching, but regex on 770,000 domains is a death sentence for performance.
The solution is a Reversed-Label Trie. A trie is a tree data structure. We take domains, split them by their dots, reverse them, and store the Top Level Domain (TLD) at the root.
// evil.com is stored as:
trie["com"]["evil"]["$"] = metadata
If someone looks up sub.evil.com, the lookup engine walks the tree: com → evil → sub.
But wait! When it hit the evil node, it saw the $ termination marker. That means a parent domain is blocklisted. We get blazing-fast, O(labels) wildcard matching for free.
function buildTrie(map) {
  const trie = Object.create(null);  // No prototype chain overhead!
  for (const [dom, data] of map.entries()) {
    const parts = dom.split('.').reverse();
    let node = trie;
    for (const p of parts) {
      if (!node[p]) node[p] = Object.create(null);
      node = node[p];
    }
    node.$ = data;
  }
  return trie;
}
Notice the Object.create(null). This creates an absolutely bare object without JavaScript’s default properties (like .toString or .constructor), which prevents accidental collisions and speeds up property access.

Phase 4: The Live API Pipeline
When a GET /host/198.51.100.4 request hits the API, here is the gauntlet it runs:
- Input Normalization: Strip
https://, lowercase everything, remove query strings. - 24-Hour Cache Check: We maintain an in-memory
Map<target, result>cache. Why 24 hours? Because the feeds only update nightly. If we’ve seen it today, return instantly. - The Bloom Filter: (3 bit tests). Miss? Return clean. Hit? Proceed.
- The Exact Map:
Map.get(ip). - The CIDR Binary Search: Check the 12 math comparisons.
- GeoIP & Reverse DNS: If it’s a domain, we check it against the Trie, check it against the Majestic Top 1 Million list (to flag high-profile false positives), and do a live DNS resolution to see if the domain points to a blocked IP.
All of this happens inside a single Node-RED function block.
Phase 5: The Feedback Loop
At the edge of my network sits a UniFi Dream Router running Intrusion Detection and Prevention (IDS/IPS).The don’t endorse me or anything, actually I am sure they probably think I am annoying and a little ugly, but I must say that I do enjoy the Dream Machine much more than the pfSense I had before it. Just gonna leave that here.
I configured a Node-RED flow to receive webhook POST requests from the router whenever it detects an intrusion attempt.
When a script kiddie in a datacenter runs a vulnerability scanner against my home network:
- The UniFi router blocks it and fires a webhook payload to Node-RED.
- Node-RED parses the payload (extracting the source IP, protocol, and IPS signature).
- The source IP is immediately written to a
custom_ip.jsonblocklist via an internal API. - The custom list is added to the API “database”
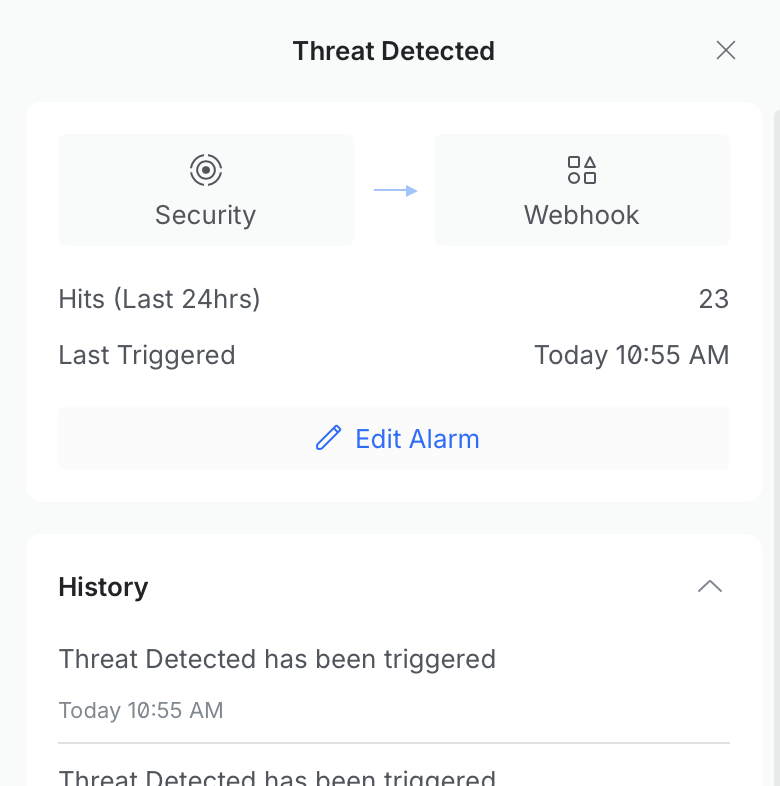
- A color-coded Discord embed is fired off to a private channel alerting me of the attack, complete with a clickable isbadip.com link.

This closes the loop. If you attack my network, within seconds, your IP is automatically pushed into the global blocklist. Future API queries for your IP will instantly flag you as malicious. It is a beautiful, fully automated feedback loop and more free real time threat intel for you!
EDIT:
People like scanning my WordPress page (this one) regularly. I am now exporting the malicious hits from Wordfence to the blocklist as well. My filter is:
| Criterion | Why |
|---|---|
blockType = 'waf' | WAF = real attack pattern match (SQLi, XSS, etc.), not rate-limit false-positives |
daysActive >= 2 | Seen on 2+ separate calendar days, rules out transient scanners |
totalBlocks >= 5 | Rules out single misconfigurations |
| RFC1918/private excluded | Prevents submitting internal addresses |
| State file dedup | Never submits the same IP twice |
Edit 2:
I wanted to go more into detail about my data sources and how I just built up my security even more.
I added a Cloudflare IP list which I can use in WAF rules, which looks like:

You get 1 list for free with 10k entries (fine for my use case). You can then use this in any of our WAF rules.
The entire Node-RED flow looks something like this:

Here is an easy to understand flowchart of the setup:

My goal is to offload as much filtering outside of my network as possible. In my dream machine I have a simple rule that includes all Cloudflare IP-ranges that blocks direct access to my public IP, that is how I ensure that traffic must flow through Cloudflare.
The Results: RAM, Speed, and Cold Starts
Because all data lives entirely in the V8 heap, we have strict memory budgets.
- The IP Map: ~15 MB
- The Domain Map & Trie: ~350 MB
- Top 1M allow-list: ~120 MB
- DNS & Result Caches: ~20 MB
The total footprint is roughly 510 MB. The LXC container has 2 GB of RAM, leaving plenty of headroom for Node.js garbage collection and Docker overhead.
What does keeping everything in RAM get us? Absurd speed.
- Clean IP Lookup:
< 0.1 ms(The Bloom filter fires, returns false, function exits). - Malicious IP Hit:
< 0.5 ms(Bloom passes, Map catches it). - Domain Lookup (DNS Cache Miss):
< 50 ms(Bound purely by the speed of DNS resolution). - Domain Lookup (Cache Hit):
< 1 ms.
When the LXC container reboots or updates, a staggered start-up sequence automatically reads the saved JSON files from the persistent volume, rebuilds the Maps, Tries, and Bloom filters, and sets the global variables.
This takes about 7 seconds. During this warmup window, any API request receives a standard HTTP 503 Service Unavailable with a Retry-After: 10 header. This acts as a cold-start guard, ensuring the API never returns a false “clean” result just because it hasn’t finished loading the threat lists yet.
It’s fast, it’s entirely free, it automatically catches bad guys in real-time, and it proves that with a little bit of JavaScript optimization and a whole lot of homelab stubbornness, you can build enterprise-grade network tooling in your pajamas (yea I may over-exaggerate a little here).
Speaking of pajamas, I know it is past your bed time! But I appreciate that you stayed up late to read my post. Thats really nice of you and I also think you are really cute ❤️❤️❤️
Until next time, baby!!!! ✌️